モバイルのアプリで、UIの実装はHTML5でいいんだけどPush通知だけは入れたいという要件に対応するために、Apache Cordovaを利用したPush通知の実装をまとめてみました。
Apache Cordovaのインストールからプロジェクトのセットアップ、必要なプラグインのインストール、最後にPush通知を実装する流れで記載していますので、Push通知の実装だけ知りたい方は前半を飛ばしてください。
この記事では、Apple Push Notification Service (APNs)を利用するiOSアプリのみを対象としています。
APNsを利用したPush通知の基本については、前回の記事「iOSアプリPush通知 開発環境の作成手順まとめ」にまとめてありますので参考にしてください。
Cordovaのインストール
Cordovaは、npmパッケージとしてインストールできます
$ sudo npm install -g cordova
プロジェクトの作成
インストールができたら、cordovaコマンドでプロジェクトを作成します
$ cordova create hello_cordova com.hrendoh.HelloCordova HelloCordova
Creating a new cordov
第1引数: プロジェクトディレクトリ名
第2引数: App ID、App ID作成時Bundle IDに入力した値
第3引数: アプリケーション表示名、XCodeのプロジェクト名にもなる
注意: Bundle identifierに、-(ハイフン)使うと「App id contains a reserved word, or is not a valid identifier.」エラーになるので、ドメインに-(ハイフン)が含まれる場合はXCodeでプロジェクトを開いて設定します
プラットフォームを追加
今回はiOSのみがターゲットなのでiOSのみ追加しておきます
プロジェクトのディレクトリに移動してplatform addコマンドでiosを追加
$ cd hello_cordova
$ cordova platform add ios
Adding ios project...
iOS project created with cordova-ios@3.9.1
Discovered plugin "cordova-plugin-whitelist" in config.xml. Installing to the project
Fetching plugin "cordova-plugin-whitelist@1" via npm
Installing "cordova-plugin-whitelist" for iOS
platforms lsでiOSが追加されていることを確認
$ cordova platforms ls
Installed platforms: ios 3.9.1
Available platforms: amazon-fireos, android, blackberry10, browser, firefoxos, osx, webos
アプリケーションのビルド
$ cordova build
platforms/iosにXCodeプロジェクトが生成されます
エミュレーターの起動と動作確認
$ cordova emulate
デフォルトでは、iPhone 6のシミュレーターが起動します

プラグインの追加
ネイティブな機能はプラグインとして提供されているので、Push通知もプラグインを追加する必要があります
Push通知に加えてJavascriptのログをコンソールに出力するプラグインも追加しておきます
$ cordova plugin add cordova-plugin-console
$ cordova plugin add phonegap-plugin-push
cordova-plugin-consoleは、javascriptのconsole.logをNSLogに渡してくれるプラグイン、デバッグに必須なので入れておく
phonegap-plugin-pushは、Push通知用のプラグイン、Push系プラグインでは最も使われている
インストールされたプラグインは、plugin lsで確認できます
$ cordova plugin ls
cordova-plugin-console 1.0.1 "Console"
phonegap-plugin-push 1.2.3 "PushPlugin"
他にネイティブな機能が必要になった場合は、プラグインをSearch Cordova Pluginsで探すことができます
cordova-plugin-consoleの使い方
cordova-plugin-consoleの動作確認と、ログレベルの設定方法をメモしておきます
ログ出力の確認
cordova-plugin-consoleプラグインを追加するだけで、console.logを使ってログが出力されるようになります
例えば、新規作成後のプロジェクトのindex.jsには、47行目にconsole.logが記述されているのでそのログを確認してみます
// www/js/index.js
    receivedEvent: function(id) {
        var parentElement = document.getElementById(id);
        var listeningElement = parentElement.querySelector('.listening');
        var receivedElement = parentElement.querySelector('.received');

        listeningElement.setAttribute('style', 'display:none;');
        receivedElement.setAttribute('style', 'display:block;');

        console.log('Received Event: ' + id);
    }
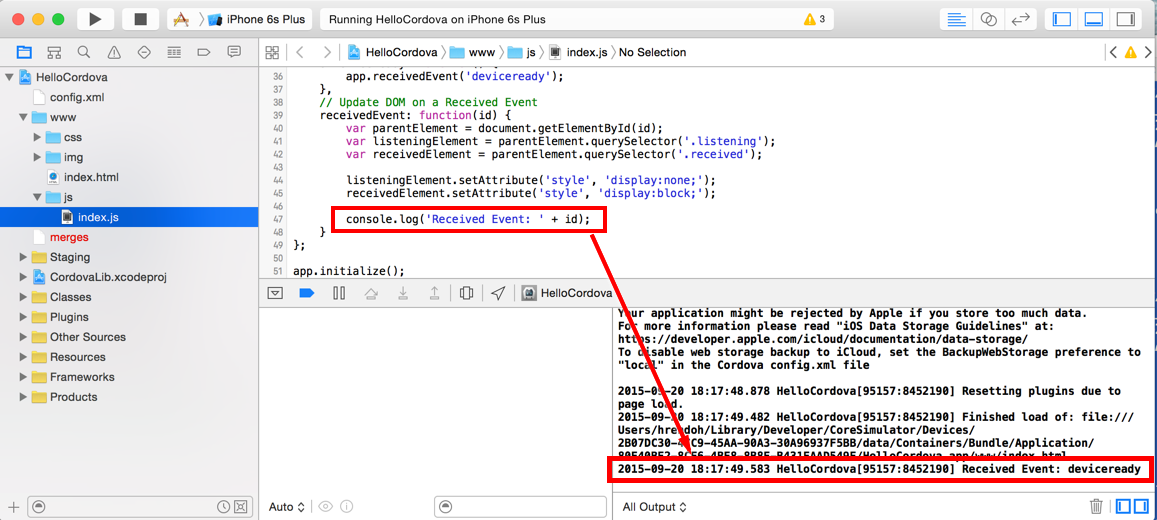
console.logは、ファイルにはログファイルplatforms/ios/cordova/console.logに出力されます
cordova-plugin-consoleプラグインをインストールした後にcordova emulateを実行すると、以下のようにconsole.logの出力がファイルに書きだされていることを確認できます
// platforms/ios/cordova/console.log
2015-09-20 18:08:54.404 HelloCordova[94683:8441175] DiskCookieStorage changing policy from 2 to 0, cookie file: file:///Users/hrendoh/Library/Developer/CoreSimulator/Devices/xxxxxx-xxxx-xxxx-xxxxxx/data/Containers/Data/Application/xxxxxx-xxxx-xxxx-xxxxxx/Library/Cookies/com.example.hello.binarycookies
2015-09-20 18:08:54.682 HelloCordova[94683:8441175] Apache Cordova native platform version 3.9.1 is starting.
2015-09-20 18:08:54.682 HelloCordova[94683:8441175] Multi-tasking -> Device: YES, App: YES
2015-09-20 18:08:54.699 HelloCordova[94683:8441175] Unlimited access to network resources
2015-09-20 18:08:54.714 HelloCordova[94683:8441175]

Started backup to iCloud! Please be careful.
Your application might be rejected by Apple if you store too much data.
For more information please read "iOS Data Storage Guidelines" at:
https://developer.apple.com/icloud/documentation/data-storage/
To disable web storage backup to iCloud, set the BackupWebStorage preference to "local" in the Cordova config.xml file

2015-09-20 18:08:55.476 HelloCordova[94683:8441175] Resetting plugins due to page load.
2015-09-20 18:08:55.657 HelloCordova[94683:8441175] Finished load of: file:///Users/hrendoh/Library/Developer/CoreSimulator/Devices/xxxxxx-xxxx-xxxx-xxxxxx/data/Containers/Bundle/Application/xxxxxx-xxxx-xxxx-xxxxxx/HelloCordova.app/www/index.html
2015-09-20 18:08:55.699 HelloCordova[94683:8441175] Received Event: deviceready
また、XCodeからアプリ起動した場合は、XCodeのコンソールで確認できます
XCodeでプロジェクトを開く
$ open platforms/ios/HelloCordova.xcodeproj
アプリを起動すると、XCodeのコンソールにログが出力されています
ログレベルの変更
plugins/cordova-plugin-console/www/logger.jsを確認するとログの優先順位は、以下の順序でデフォルトはWARNです
ログのレベルは以下の通り
- LOG
- ERROR
- WARN
- INFO
- DEBUG
INFOやDEBUGレベルに変更した場合は、logger.levelメソッドにログレベルを指定します
例えばログレベルをDEBUGに変更するには、index.jsのonDeviceReadyでlogger.levelを呼びます
また、plugins/cordova-plugin-console/www/logger.jsにはcordova.loggerでアクセスする必要があります
// www/js/index.js" firstline="35" highlight="37,38"]
    onDeviceReady: function() {
        app.receivedEvent('deviceready');
        cordova.logger.level(cordova.logger.DEBUG);
        console.debug('Debug log');
    },
console.logを確認するとconsole.debugに渡したメッセージが出力されています
// platforms/ios/cordova/console.log
...
2015-09-20 18:44:58.081 HelloCordova[95780:8478256] Received Event: deviceready
2015-09-20 18:44:58.179 HelloCordova[95780:8478256] DEBUG: Debug log
Push通知の実装
ここから、記事の本題であるphonegap-plugin-pushプラグインを利用したPush通知の実装をしていきます
Apple Developer Centerでアプリを追加
Apple Developer Center (Member Center)でApple Push Notification Service (APNs)を有効にしたプロビジョニングプロファイルを作成し、Xcodeにインストールします
手順は、前回の記事「iOSアプリPush通知 開発環境の作成手順まとめ」の以下の見出しを参照してください
- App IDの作成
- Apple Push Notification service (APNS)用証明書の作成
- プロビジョニングプロファイルの作成
プロジェクトの設定
以下、XCodeでプロジェクトを開き実施します
1. [Bundle identifier]を設定する
[TARGETS]の[General]を開きます
[Bundle identifier]にプロビジョニングプロファイルに指定した[App ID]が指定されていることを確認
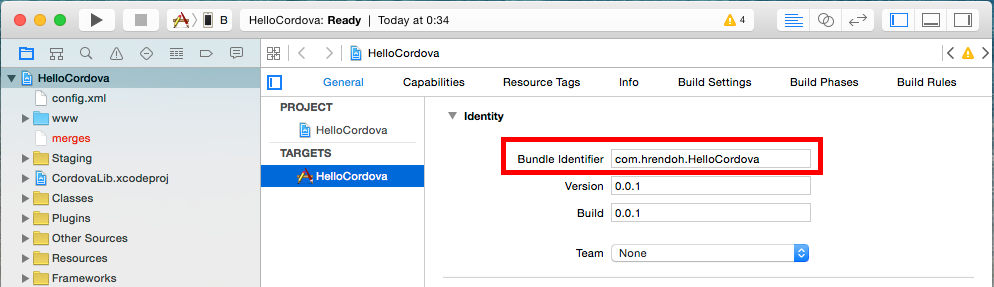
異なっていれば修正します
2. プロビジョニングプロファイルを設定する
[PROJECTS]の[Build Settings]を開きます
[Code Signing]の[Code Signing Identity]に、用意したプロビジョニングプロファイルを設定します

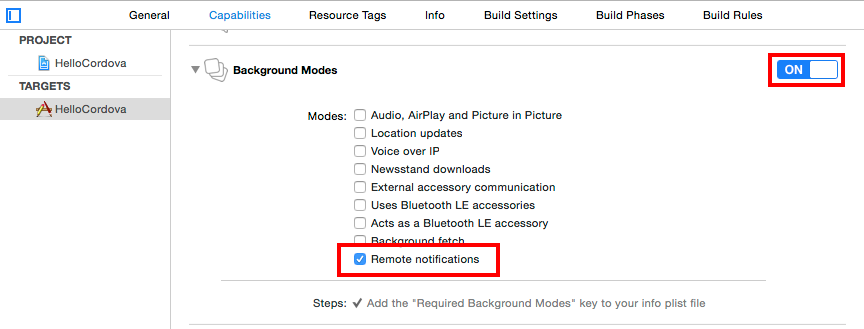
3. アプリケーションのPush通知を許可する
[TARGETS]の[Capabilities]を開きます
[Background Modes]を[On]に切り替え、[Remote notifications]を有効にします
4. コンパイル対象ソースの設定 (必要な場合)
通常必要ないはずだが、Linker Errorが発生する場合は、[TARGETS] > [Build Phases]の[Compile Sources]を確認して修正します
アプリケーションの実装
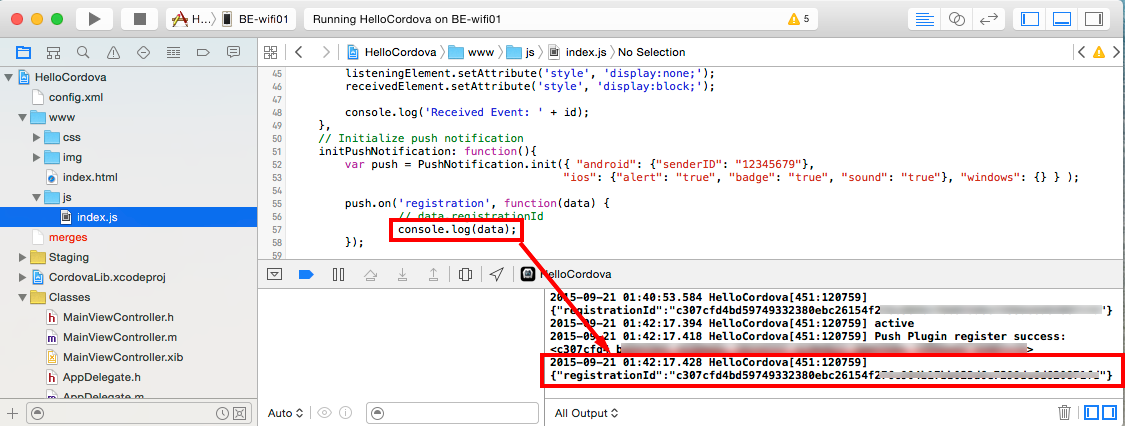
Apple Push Notification Serviceにデバイス登録してdeviceTokenを取得するプログラムは以下のように実装します
// www/js/index.js" highlight="5,19-40"]
var app = {
    ...
    onDeviceReady: function() {
        app.receivedEvent('deviceready');
        app.initPushNotification();
    },
    // Update DOM on a Received Event
    receivedEvent: function(id) {
        var parentElement = document.getElementById(id);
        var listeningElement = parentElement.querySelector('.listening');
        var receivedElement = parentElement.querySelector('.received');

        listeningElement.setAttribute('style', 'display:none;');
        receivedElement.setAttribute('style', 'display:block;');

        console.warn('Received Event: ' + id);
    },
    // Initialize push notification
    initPushNotification: function(){
        var push = PushNotification.init({ "android": {"senderID": "12345679"},
                                         "ios": {"alert": "true", "badge": "true", "sound": "true"}, "windows": {} } );

        push.on('registration', function(data) {
                // data.registrationId
                console.log(data);
        });

        push.on('notification', function(data) {
                // data.message,
                // data.title,
                // data.count,
                // data.sound,
                // data.image,
                // data.additionalData
        });

        push.on('error', function(e) {
                // e.message
        });
    }
};
実機で起動すると以下のようにいつもの通知の許可を求めるダイアログが表示されます
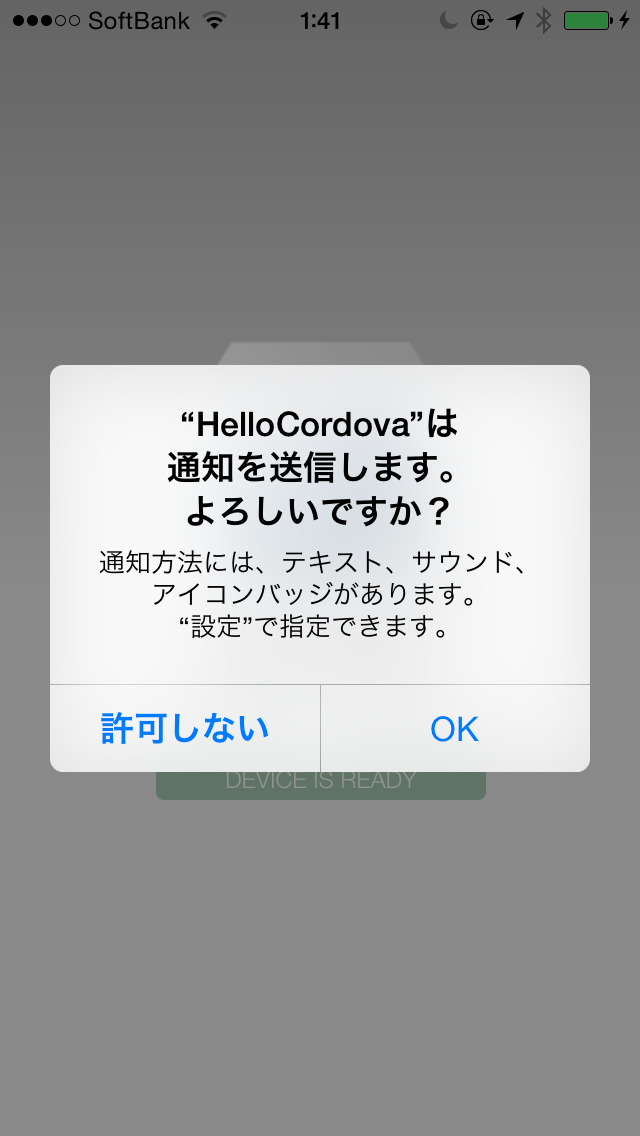
[OK]を選択すると、registrationコールバックが呼び出されて、XCode上のコンソールにdeviceToken(registrationId)が表示されます
前回の記事「iOSアプリPush通知 開発環境の作成手順まとめ」の「Push通知プロバイダー側のアプリ実装」の手順に従って以下のようにRubyのプログラムを実装して実行
require 'rubygems'
require 'apns'
APNS.host = 'gateway.sandbox.push.apple.com'
APNS.pem = 'aps_development.pem'
APNS.port = 2195
device_token = 'c307cfd4bd59749332380ebc26154f27xxxxxxxxxxxxxxxxxxxxxxxx' # 取得したdeviceToken(registerationId)をコピー
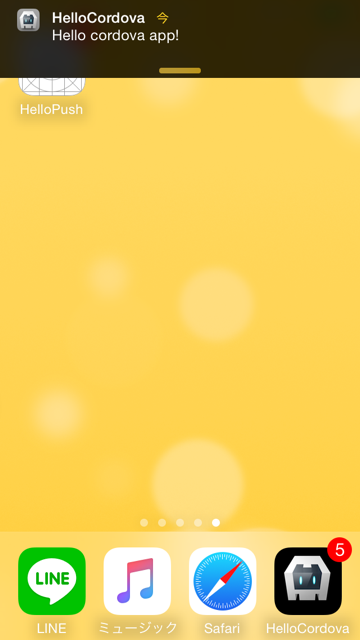
APNS.send_notification(device_token, :alert => 'Hello cordova app!', :badge => 5, :sound => 'default')
以下のように、通知メッセージを受信し、バッジが指定通り5になっていることを確認できます