Apacheをソースからインストールする手順を改めて確認してみたのでまとめてみました。
ところで、改めてソースコードからApacheをインストールするメリットを考えてみると
- パッケージインストールすると使わないstableモジュールも含まれてしまうので、不要なモジュールを削除して軽くしたい
- パッケージシステム(UbuntuなのでAPT)でインストールできないバージョン(特に最新版)をインストールしたい
の2点くらいが思いつきます。
前者については、そこまでシビアな環境の場合、現在ならNginx使うなどの代替手段や他の構成を考えたほうが良いかもしれません。しかし慣れているApacheで軽快に動作する環境を構築したいという場合もまだ多そうではあります。
後者については、現在(2015/8/9)のUbuntu 14.04だと、APTのデフォルトリポジトリからインストールすると2.4.7がインストールされます。
$ apachectl -v
Server version: Apache/2.4.7 (Ubuntu)
Server built:   Jul 24 2015 17:25:11
確かに安定版最新の2.4.16よりはだいぶ古いです。
PPAを探せばさらに新しいバージョンもAPTでインストールできそうですが、公式の安定版に追随するならソースからビルド・インストールするの方が運用は楽な気がします。
では、以下インストール手順のまとめです。
必要なパッケージのインストール
Apache APRおよびAPR-Util
Apache 2.4は、APR (Apache Portable Runtime) とAPR-Utilが必須になっている
APR and APR-Util
Make sure you have APR and APR-Util already installed on your system. If you don't, or prefer to not use the system-provided versions, download the latest versions of both APR and APR-Util from Apache APR, unpack them into /httpd_source_tree_root/srclib/apr and /httpd_source_tree_root/srclib/apr-util (be sure the directory names do not have version numbers; for example, the APR distribution must be under /httpd_source_tree_root/srclib/apr/) and use ./configure's --with-included-apr option. On some platforms, you may have to install the corresponding -dev packages to allow httpd to build against your installed copy of APR and APR-Util.
http://apr.apache.org
APRのインストール手順
$ wget http://ftp.meisei-u.ac.jp/mirror/apache/dist//apr/apr-1.5.2.tar.gz
$ tar xvfz apr-1.5.2.tar.gz
$ cd apr-1.5.2
$ ./configure
$ make
$ sudo make install
./configureに--prefixを指定しない場合、デファルトで/usr/local/aprにインストールされる
./configureでエラーメッセージ「cannot remove `libtoolT’: No such file or directory」が表示される場合は、「Error while compiling apache APR make file not found」を参考に./configureファイルを修正する
# ./configure
$RM "$cfgfile"
を以下のように修正するとエラーが解消する
# ./configure
$RM -f "$cfgfile"
APR-Utilのインストール手順
./configureには、APRのインストールディレクトリを指定する
$ wget http://ftp.meisei-u.ac.jp/mirror/apache/dist//apr/apr-util-1.5.4.tar.gz
$ tar xvfz apr-util-1.5.4.tar.gz
$ cd apr-util-1.5.4
$ ./configure --with-apr=/usr/local/apr
$ make
$ sudo make install
APR-Utilは/usr/local/apr/libに追加される
PCRE
$ sudo apt-get install libpcre3 libpcre3-dev
Ubuntu / Debian Install PCRE Library ( Perl 5 Compatible Regular Expression Library )
ソースのダウンロード
安定版は、http://httpd.apache.org/download.cgi からtarballをダウンロードできる
リンクをコピーしてwgetでダウンロード
$ wget http://ftp.tsukuba.wide.ad.jp/software/apache//httpd/httpd-2.4.16.tar.gz
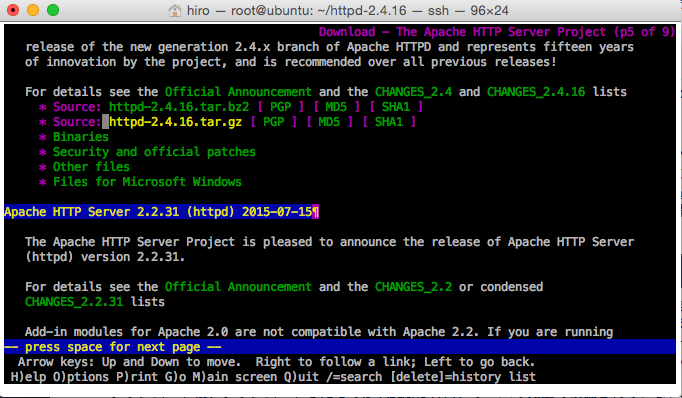
公式ドキュメントの手順のようにテキストブラウザ lynx を使う手順
$ sudo apt-get install lynx-cur
$ lynx http://httpd.apache.org/download.cgi
以下のように、テキストブラウザが開きリンクを辿ってソースをダウンロードできる
ソースコードの展開
$ tar xvfz httpd-2.4.16.tar.gz
$ cd httpd-2.4.16
ビルド
./configureには、--with-aprオプションにAPRのディレクトリを指定する必要がある
それ以外はデフォルトにしてインストール
$ ./configure --with-apr=/usr/local/apr
$ make
$ sudo make install
/usr/local/apache2にインストールされる
また、デフォルトでインストールされるモジュールを確認してみると以下の通り
$ sudo /usr/local/apache2/bin/apachectl -M
Loaded Modules:
 core_module (static)
 so_module (static)
 http_module (static)
 mpm_event_module (static)
 authn_file_module (shared)
 authn_core_module (shared)
 authz_host_module (shared)
 authz_groupfile_module (shared)
 authz_user_module (shared)
 authz_core_module (shared)
 access_compat_module (shared)
 auth_basic_module (shared)
 reqtimeout_module (shared)
 filter_module (shared)
 mime_module (shared)
 log_config_module (shared)
 env_module (shared)
 headers_module (shared)
 setenvif_module (shared)
 version_module (shared)
 unixd_module (shared)
 status_module (shared)
 autoindex_module (shared)
 dir_module (shared)
 alias_module (shared)
--enable-mods-sharedを指定しない場合はmostがデフォルトらしい?
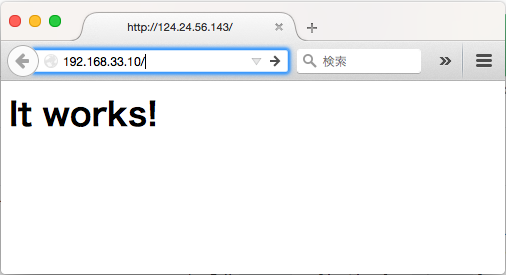
動作確認
Apacheは、apachectlコマンドで起動する
$ sudo /usr/local/apache2/bin/apachectl start
ファイヤーウォールの80ポートを開けてアクセスするとデフォルトのindex.htmlが表示される
停止
$ sudo /usr/local/apache2/bin/apachectl stop
サービスとして登録
apachectlへのシンボリックリンクを/etc/init.dに作成しデーモンとして登録
$ sudo ln -s /usr/local/apache2/bin/apachectl /etc/init.d/apache2
$ sudo update-rc.d -f apache2 defaults 91 09
参考:
Apache2.4.4をUbuntu10.04にソースからインストールしてみる
Building Apache 2.2 from source for Ubuntu Dapper