Node.jsのLambda関数からデータベースにアクセスするには、Postgresqlの場合はnpm pgパッケージが利用できます。
npmパッケージはプロジェクトにローカルインストールするとnode_modulesディレクトリに保存されるので、それを一緒にZipするとLambda関数のJSで読み込めるようになります。
Node.jsのLambda関数をnpmでパッケージ管理して開発する手順について調べてみたことを手順化してまとめてみました。
前提条件として、Node.JSとAWS CLIが利用できる環境が必要です。
プロジェクトの作成
Gitでバージョン管理し、npmプロジェクトとしてpackage.xmlを作成していきます。
プロジェクトディレクトリを作成し、git init
$ mkdir nodejs-pg-sample && cd nodejs-pg-sample
$ git init
npm initを実行して、package.xmlを作成
$ npm init
This utility will walk you through creating a package.json file.
It only covers the most common items, and tries to guess sensible defaults.
See `npm help json` for definitive documentation on these fields
and exactly what they do.
Use `npm install <pkg> --save` afterwards to install a package and
save it as a dependency in the package.json file.
Press ^C at any time to quit.
name: (hello-lambda-js4) nodejs-pg-sample
version: (1.0.0)
description:
entry point: (index.js)
test command:
git repository:
keywords:
author:
license: (ISC)
About to write to /path/to/nodejs-pg-sample/package.json:
{
"name": "nodejs-pg-sample",
"version": "1.0.0",
"description": "",
"main": "index.js",
"scripts": {
"test": "echo \"Error: no test specified\" && exit 1"
},
"author": "",
"license": "ISC"
}
Is this ok? (yes)
npm pgパッケージのインストール
npm installを実行して、pgパッケージをインストールします。
--saveオプションを付けて、プロジェクトのnode_modulesディレクトリにパッケージを保存するようにしまうs。
$ npm install pg --save
lambda-nodejs-pg@1.0.0 /path/to/nodejs-pg-sample
└─┬ pg@4.5.1
  ├── buffer-writer@1.0.1
  ├── generic-pool@2.1.1
  ├── packet-reader@0.2.0
  ├── pg-connection-string@0.1.3
  ├─┬ pg-types@1.10.0
  │ ├── ap@0.2.0
  │ ├── postgres-array@1.0.0
  │ ├── postgres-bytea@1.0.0
  │ ├── postgres-date@1.0.1
  │ └─┬ postgres-interval@1.0.1
  │   └── xtend@4.0.1
  ├─┬ pgpass@0.0.3
  │ └─┬ split@0.3.3
  │   └── through@2.3.8
  └── semver@4.3.6

npm WARN EPACKAGEJSON lambda-nodejs-pg@1.0.0 No description
npm WARN EPACKAGEJSON lambda-nodejs-pg@1.0.0 No repository field.
node_modulesディレクトリが作成され、pgとその依存パッケージがインストールされたことを確認できます。
$ tree -L 2
.
├── node_modules
│   ├── ap
│   ├── buffer-writer
│   ├── generic-pool
│   ├── packet-reader
│   ├── pg
│   ├── pg-connection-string
│   ├── pg-types
│   ├── pgpass
│   ├── postgres-array
│   ├── postgres-bytea
│   ├── postgres-date
│   ├── postgres-interval
│   ├── semver
│   ├── split
│   ├── through
│   └── xtend
└── package.json
ハンドラの作成
Lambda関数には、RDSのPostgresqlからデータを取得してJSONで返す処理を記述します。
// indes.js
var pg = require('pg'); // pgパッケージの読み込み

// RDSのPostgresqlへの接続情報
var conString = "tcp://pguser:pgpasswd@pg.xxxxxxxxxx.us-east-1.rds.amazonaws.com:5432/example";

// クエリー
var queryString = (function () {/*
  SELECT ID, NAME FROM COMPANY
*/}).toString().match(/[^]*\/\*([^]*)\*\/\}$/)[1];

exports.handler = function(event, context){
  console.log("trying to connect...");
  // PostgreSQLへ接続を試行
  pg.connect(conString, function(err, client) {
    if(err) {
      console.log('>> Could not connect to postgresql.', err);
      // 異常終了時はcontext.failを呼び出す
      context.fail(err);
      return;
    }
    console.log(">> Connected.");
    client.query(queryString, function(err, result) {
      if(err) {
        console.log('error running query', err);
        context.fail(err);
        return;
      }
      var jsonResult = JSON.stringify( result );
      console.log(">>> successful query. jsonResult: " +  jsonResult);
      client.end();
      // 正常終了時はcontext.succeedを呼び出す
      context.succeed(result["rows"]);
    });
  });
}
Node.jsのLambda 関数ハンドラーには、eventとcontextが渡されます。eventにはパラメータなどが含まれ、contextは、実行環境やレスポンスを渡す関数などが定義されています。
context.failを呼び出すと、ステータスfailedで終了します。
正常終了時は、context.succeedを呼び出します。引数に渡した文字列が関数のレスポンスボディになります。
以上で、おおよその雰囲気はつかめたかと思います。
Lambda関数を作成
作成したハンドラのコードとnpmパッケージをLambda関数としてパッケージ化して、AWSにLambda関数を作成していきます。
パッケージは、ハンドラを含むindex.jsとnpmパッケージを含むnode_modulesディレクトリをzipアーカイブするだけです。
$ zip -r nodejs-pg-sample.zip index.js node_modules
パッケージができたら、AWS CLIのcreate-functionコマンドでLambda関数を作成します。
$ aws lambda create-function \
--function-name nodejs-pg-sample \
--runtime nodejs --handler index.handler \
--role arn:aws:iam::111122223333:role/lambda_basic_execution \
--zip-file fileb://./nodejs-pg-sample.zip
{
    "CodeSha256": "ncRRnnmstjhmn+vn/H5BBCvGIbBnpMRw/4hjEvynJ0U=",
    "FunctionName": "nodejs-pg-sample",
    "CodeSize": 261913,
    "MemorySize": 128,
    "FunctionArn": "arn:aws:lambda:us-east-1:111122223333:function:nodejs-pg-sample",
    "Version": "$LATEST",
    "Role": "arn:aws:iam::860587546930:role/lambda_basic_execution",
    "Timeout": 3,
    "LastModified": "2016-03-14T16:54:02.168+0000",
    "Handler": "index.handler",
    "Runtime": "nodejs",
    "Description": ""
}
--roleには、LambdaのHello Worldチュートリアルを試したときに作成された、ロールを指定しています。
動作の確認
ここまでで一旦、動作をManagement Consoleで確認してみます。
作成されたLambda関数の詳細を開き[Test]ボタンをクリックしてみます。
以下のような結果になれば成功です。
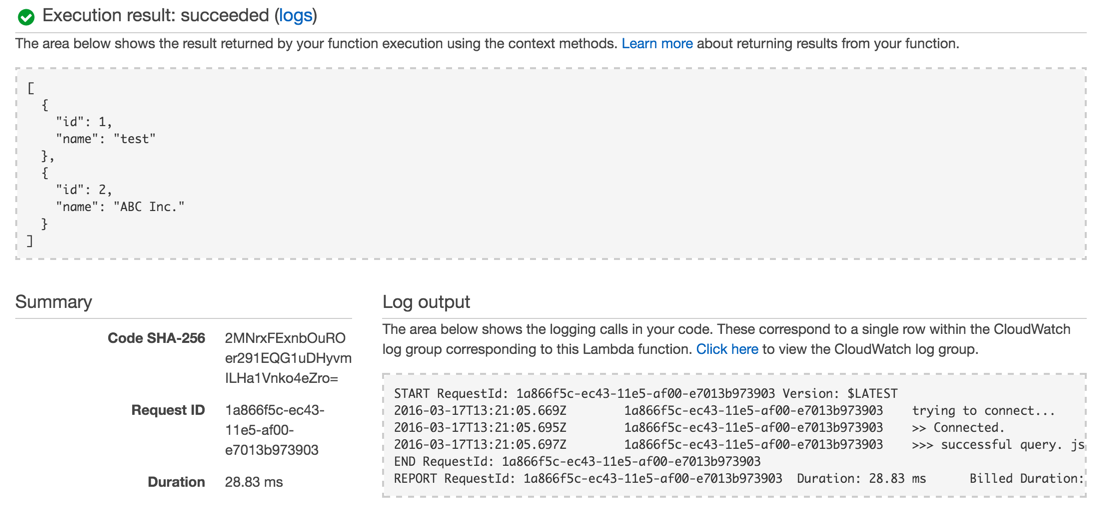
Execution resultはsucceededになり、context.succeedに渡したJSONが表示されてます。
[
  {
    "id": 1,
    "name": "test"
  },
  {
    "id": 2,
    "name": "ABC Inc."
  }
]
Log outputでは、以下のように実行ログを確認できます。
START RequestId: 1a866f5c-ec43-11e5-af00-e7013b973903 Version: $LATEST
2016-03-17T13:21:05.669Z    1a866f5c-ec43-11e5-af00-e7013b973903    trying to connect...
2016-03-17T13:21:05.695Z    1a866f5c-ec43-11e5-af00-e7013b973903    >> Connected.
2016-03-17T13:21:05.697Z    1a866f5c-ec43-11e5-af00-e7013b973903    >>> successful query. jsonResult: {"command":"SELECT","rowCount":2,"oid":null,"rows":[{"id":1,"name":"test"},{"id":2,"name":"ABC Inc."}],"fields":[{"name":"id","tableID":16394,"columnID":1,"dataTypeID":23,"dataTypeSize":4,"dataTypeModifier":-1,"format":"text"},{"name":"name","tableID":16394,"columnID":2,"dataTypeID":25,"dataTypeSize":-1,"dataTypeModifier":-1,"format":"text"}],"_parsers":[null,null],"rowAsArray":false}
END RequestId: 1a866f5c-ec43-11e5-af00-e7013b973903
REPORT RequestId: 1a866f5c-ec43-11e5-af00-e7013b973903  Duration: 28.83 ms  Billed Duration: 100 ms     Memory Size: 128 MB Max Memory Used: 28 MB
失敗のケースは、Execution resultはfailedと表示され、context.failに渡した文字列が表示されます。

パッケージ化とデプロイのスクリプト化
Lambda関数のパッケージ化と作成までは、手動でzipしてCLIを直接実行しましたが、開発中は、パッケージのビルドとデプロイについては、package.jsonにスクリプトを定義しておくと作業を効率化できます。
複数のLambda関数を組み合わせる場合は、GulpやGruntを使ったほうが良さそうですが、単体のLambda関数であればpackage.xmlにコマンドを定義しておくだけでも十分かと思います。
以下のように、 package.xmlに、パッケージ化を行うbuildとLambda関数をUploadするdeployを定義してみました。
// package.json
{
  "name": "nodejs-pg-sample",
  "version": "1.0.0",
  "description": "",
  "main": "index.js",
  "scripts": {
    "test": "echo \"Error: no test specified\" && exit 1",
    "build": "zip -r nodejs-pg-sample.zip index.js node_modules",
    "deploy": "aws lambda update-function-code --function-name nodejs-pg-sample --zip-file fileb://./nodejs-pg-sample.zip"
  },
  "author": "",
  "license": "ISC",
  "dependencies": {
    "pg": "^4.5.1"
  }
}
ハンドラを修正した後は、以下のコマンドでパッケージ化とデプロイが実行できるようになります。
$ npm run build
$ npm run deploy