Office 365は、Outlook(Exchagne)、OneDriveおよびVideoにREST APIが用意されています。
この記事では、Office 365 REST APIを利用してOutlookのリソースにアクセスする手順について確認した内容をまとめてみました。
API関連の情報ソース
APIを利用を始めるにあたって、以下のようなドキュメントを参考にしました。
REST API全体のリファレンスについては、Office 365 API reference、利用可能なOutlookのリソースについては、Resource reference for the Mail, Calendar, Contacts, and Task REST APIsで確認できます。
日本語版は、Office 365 API リファレンスがあります。
その他の参考情報としては
以下の公式ブログなどが参考になります。
Office 365 APIの種類
Office Dev Center – Getting StartedにアクセスするとOffice 365でアプリを開発する方法がいくつか紹介されています。
Office 365 APIは、のエンドポイントを利用することができます。
- Office 365 APIs: メール、カレンダー、連絡先、ファイルへアクセスするREST API
- Office Add-ins (formerly Apps for Office): Officeへアドオンするアプリ
- SharePoint Add-Ins (formerly known as Apps for SharePoint): SharePointアプリ
- Office 365 Connectors for Groups
また、これまでいくつかにわかれていたAPI群は、Microsoft Graphとして、より多くのAPIが一つのエンドポイント https://graph.microsoft.com/ で利用可能になりました。
作成するRuby on Railsアプリについて
この記事で作成していくのは、Office 365のREST APIへアクセしOutlookのメール一覧を取得し表示するRuby on Railsのアプリケーションです。
このサンプルは、Exchange Dev Blogに紹介されていた公式のサンプルでソースコードはGithubに公開されています。
Exchange Dev Blog: Ruby on Rails and Office 365 Tutorial
Outlook Dev Center: Write a Ruby on Rails app to get Outlook mail
Github: jasonjoh/o365-tutorial
Office 365 REST APIへのアクセスは、Azure ADのOAuth 2.0を利用します。
Office 365 APIとAzure ADの関係は、Azure ADはAuthorization Serverとして働き、Office 365 APIはAzure ADに登録されたResource Serverとなっています。
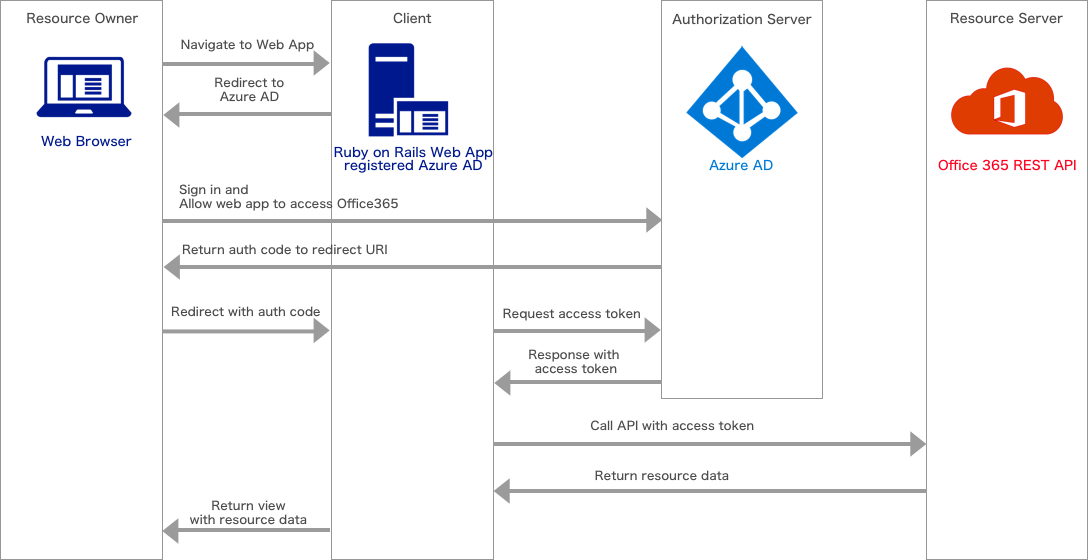
この図は、ドキュメント「Azure AD の認証シナリオ」の「デーモンまたはサーバー アプリケーション対 Web API」の図を書き直したものです、こちらのドキュメントも参照ください。
Azure ADでのOAuthの説明は、Azure AD での OAuth 2.0も参考になります。
また、補足になりますが、この記事の以下の内容は2015年の中頃に検証していたメモをまとめたもので、Azure AD v2.0エンドポイントが公開される前の内容になります。
上記ブログのリンクを参照すると現在(2016.4)はv2エンドポイントベースに書き換えられています。
v2エンドポイントについては、Microsoft アカウント ユーザーおよび Azure AD ユーザーによる単一アプリでのサインインを参照ください。
では、以下Azure ADへアプリケーションを登録するところから説明していきます。
Azure ADサブスクリプションの登録
Office 365は、ドメインを作成した際に裏でAzure ADが用意されますが、Azure ADを管理するためにはAzureのサブスクリプションに紐付ける必要があります。
詳しくは、「Azure サブスクリプションを Azure Active Directory に関連付ける方法」、「Azure でのリソース アクセスについて」を参照ください。
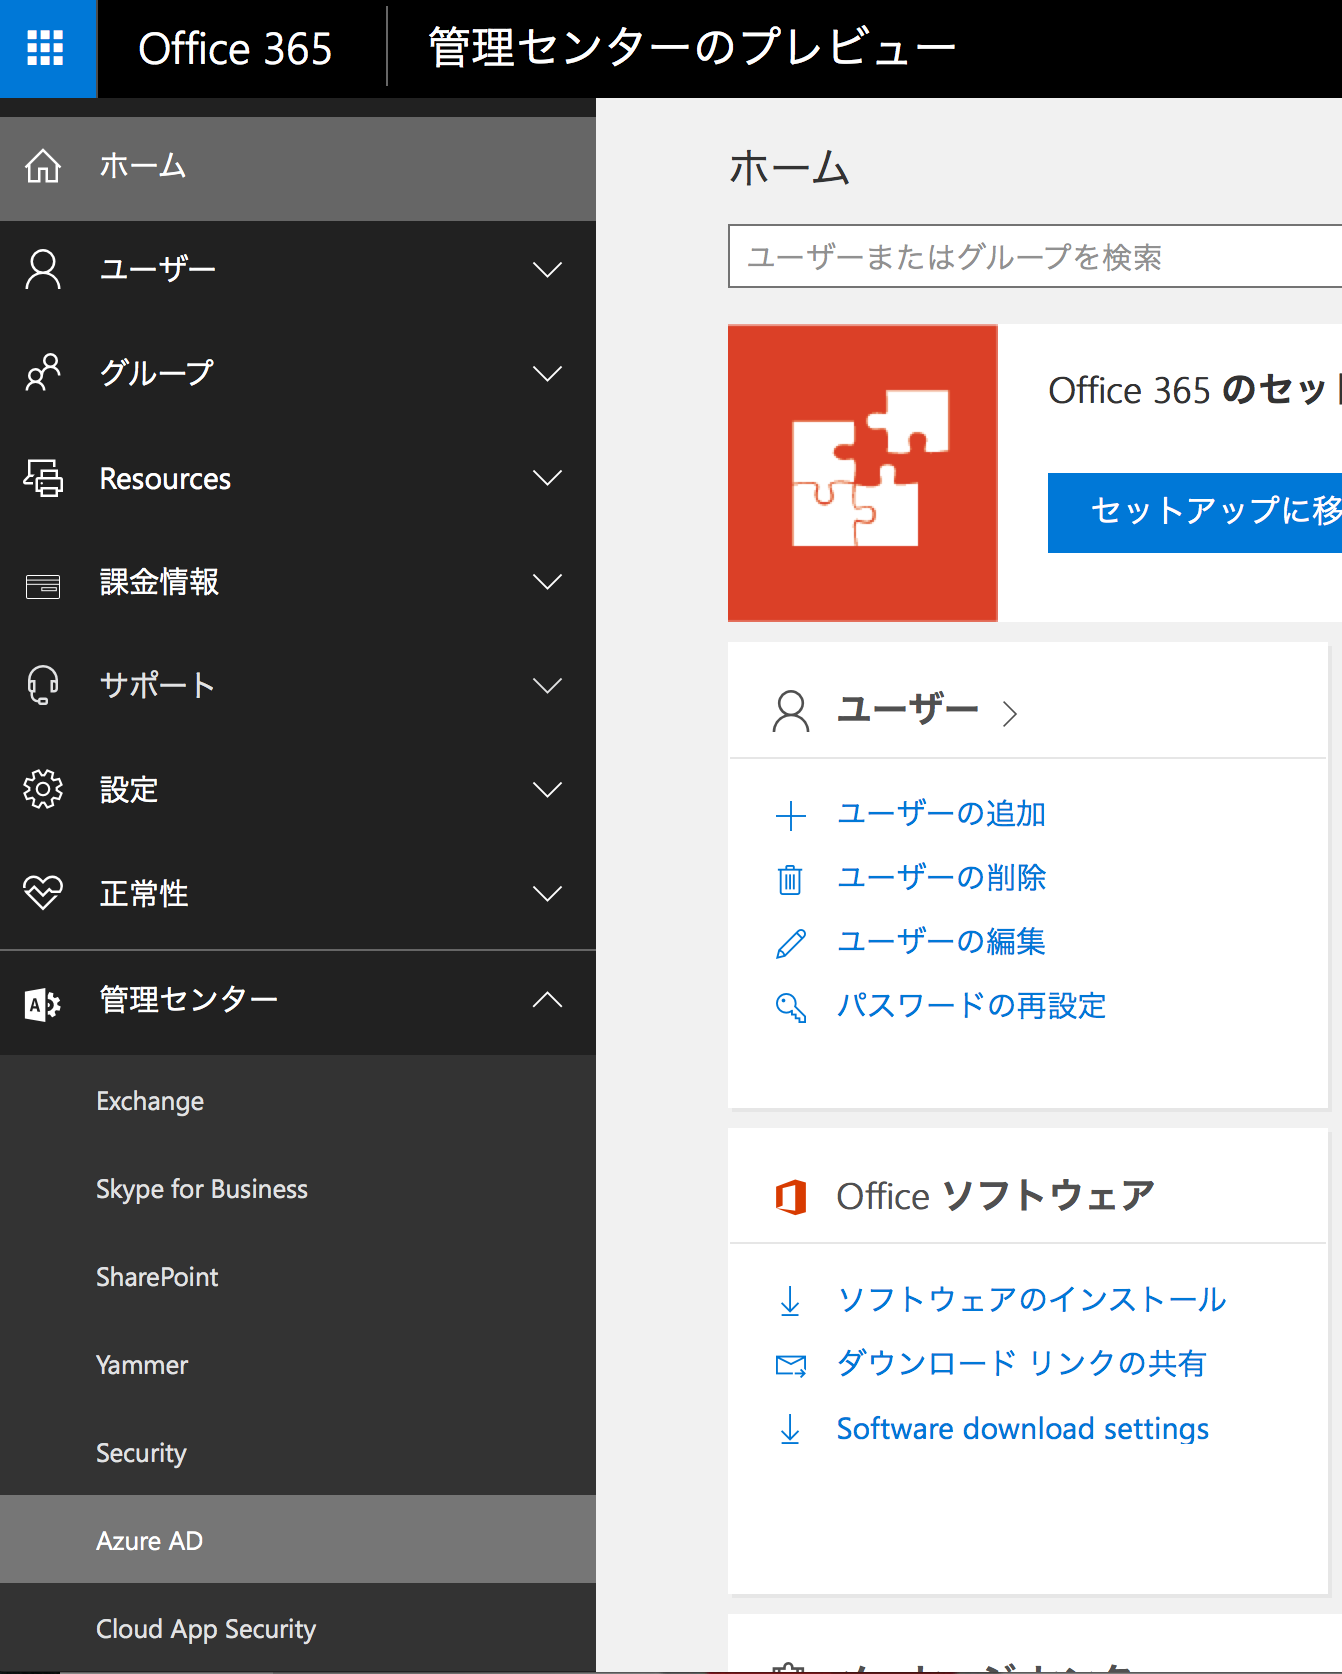
Office 365の管理センターを開き、[管理センター] > [Azure AD]を選択します
サブスクリプションを持っている、またはサブスクリプションを作成するWindowsアカウントでサインインします
Azureサブスクリプションが有効化されていない場合は、以下の画面が表示されます
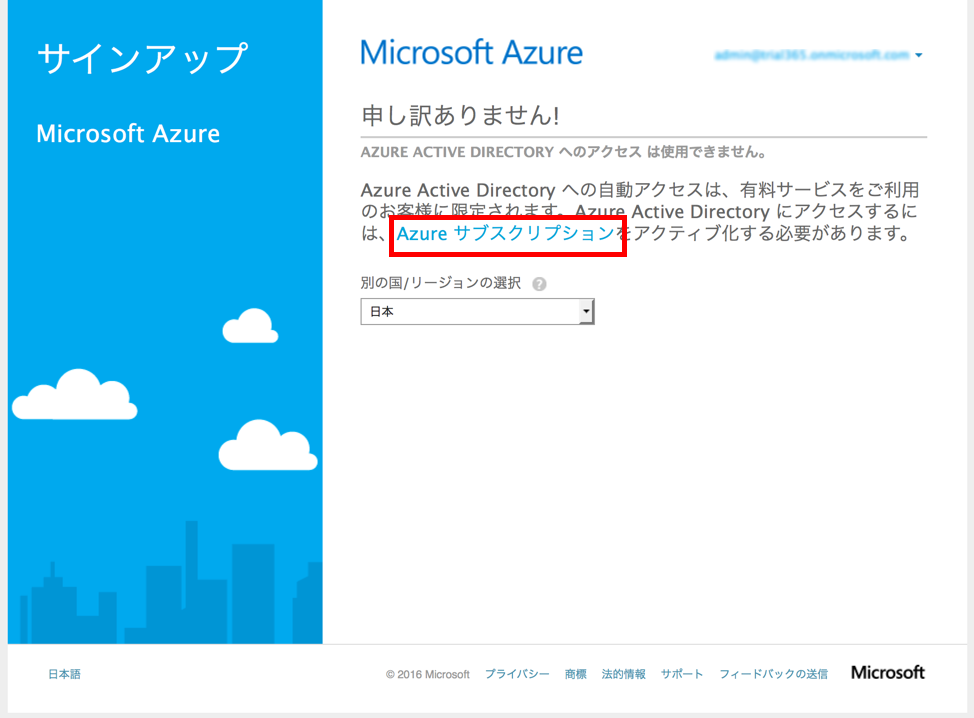
[Azure サブスクリプション]をクリックすると、Azureサインナップフォームが表示されます

無料の Azure Active Directory サブスクリプションの登録を参考にサインナップします。
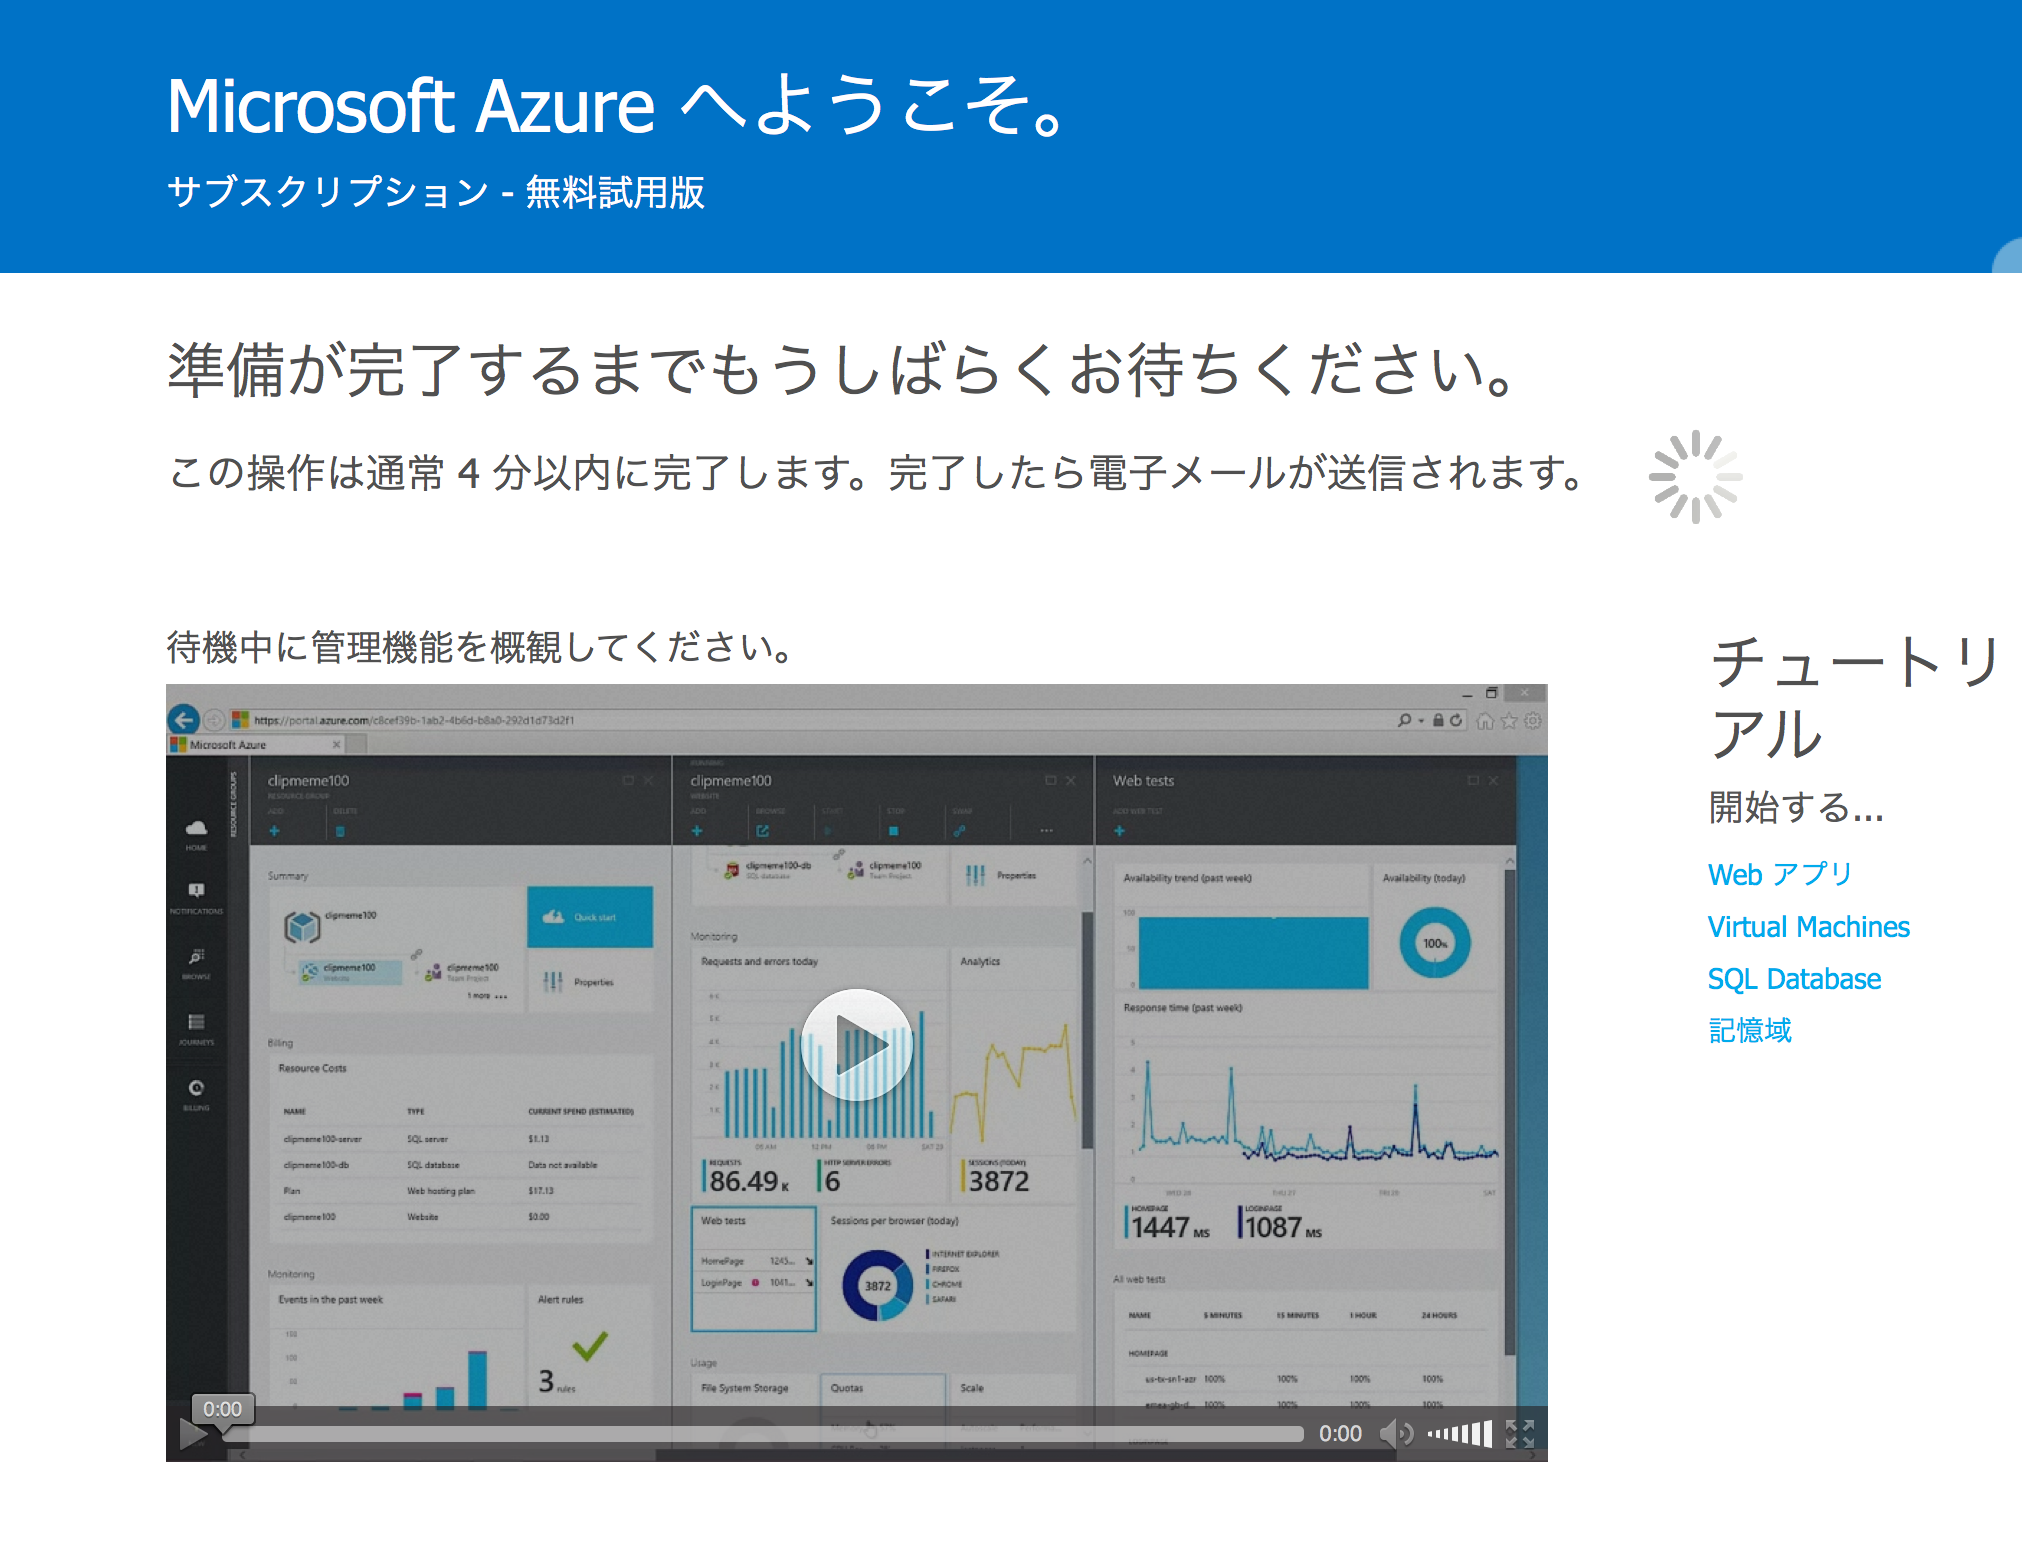
サインナップ後は、以下のページが表示されるので、しばらく待ちます
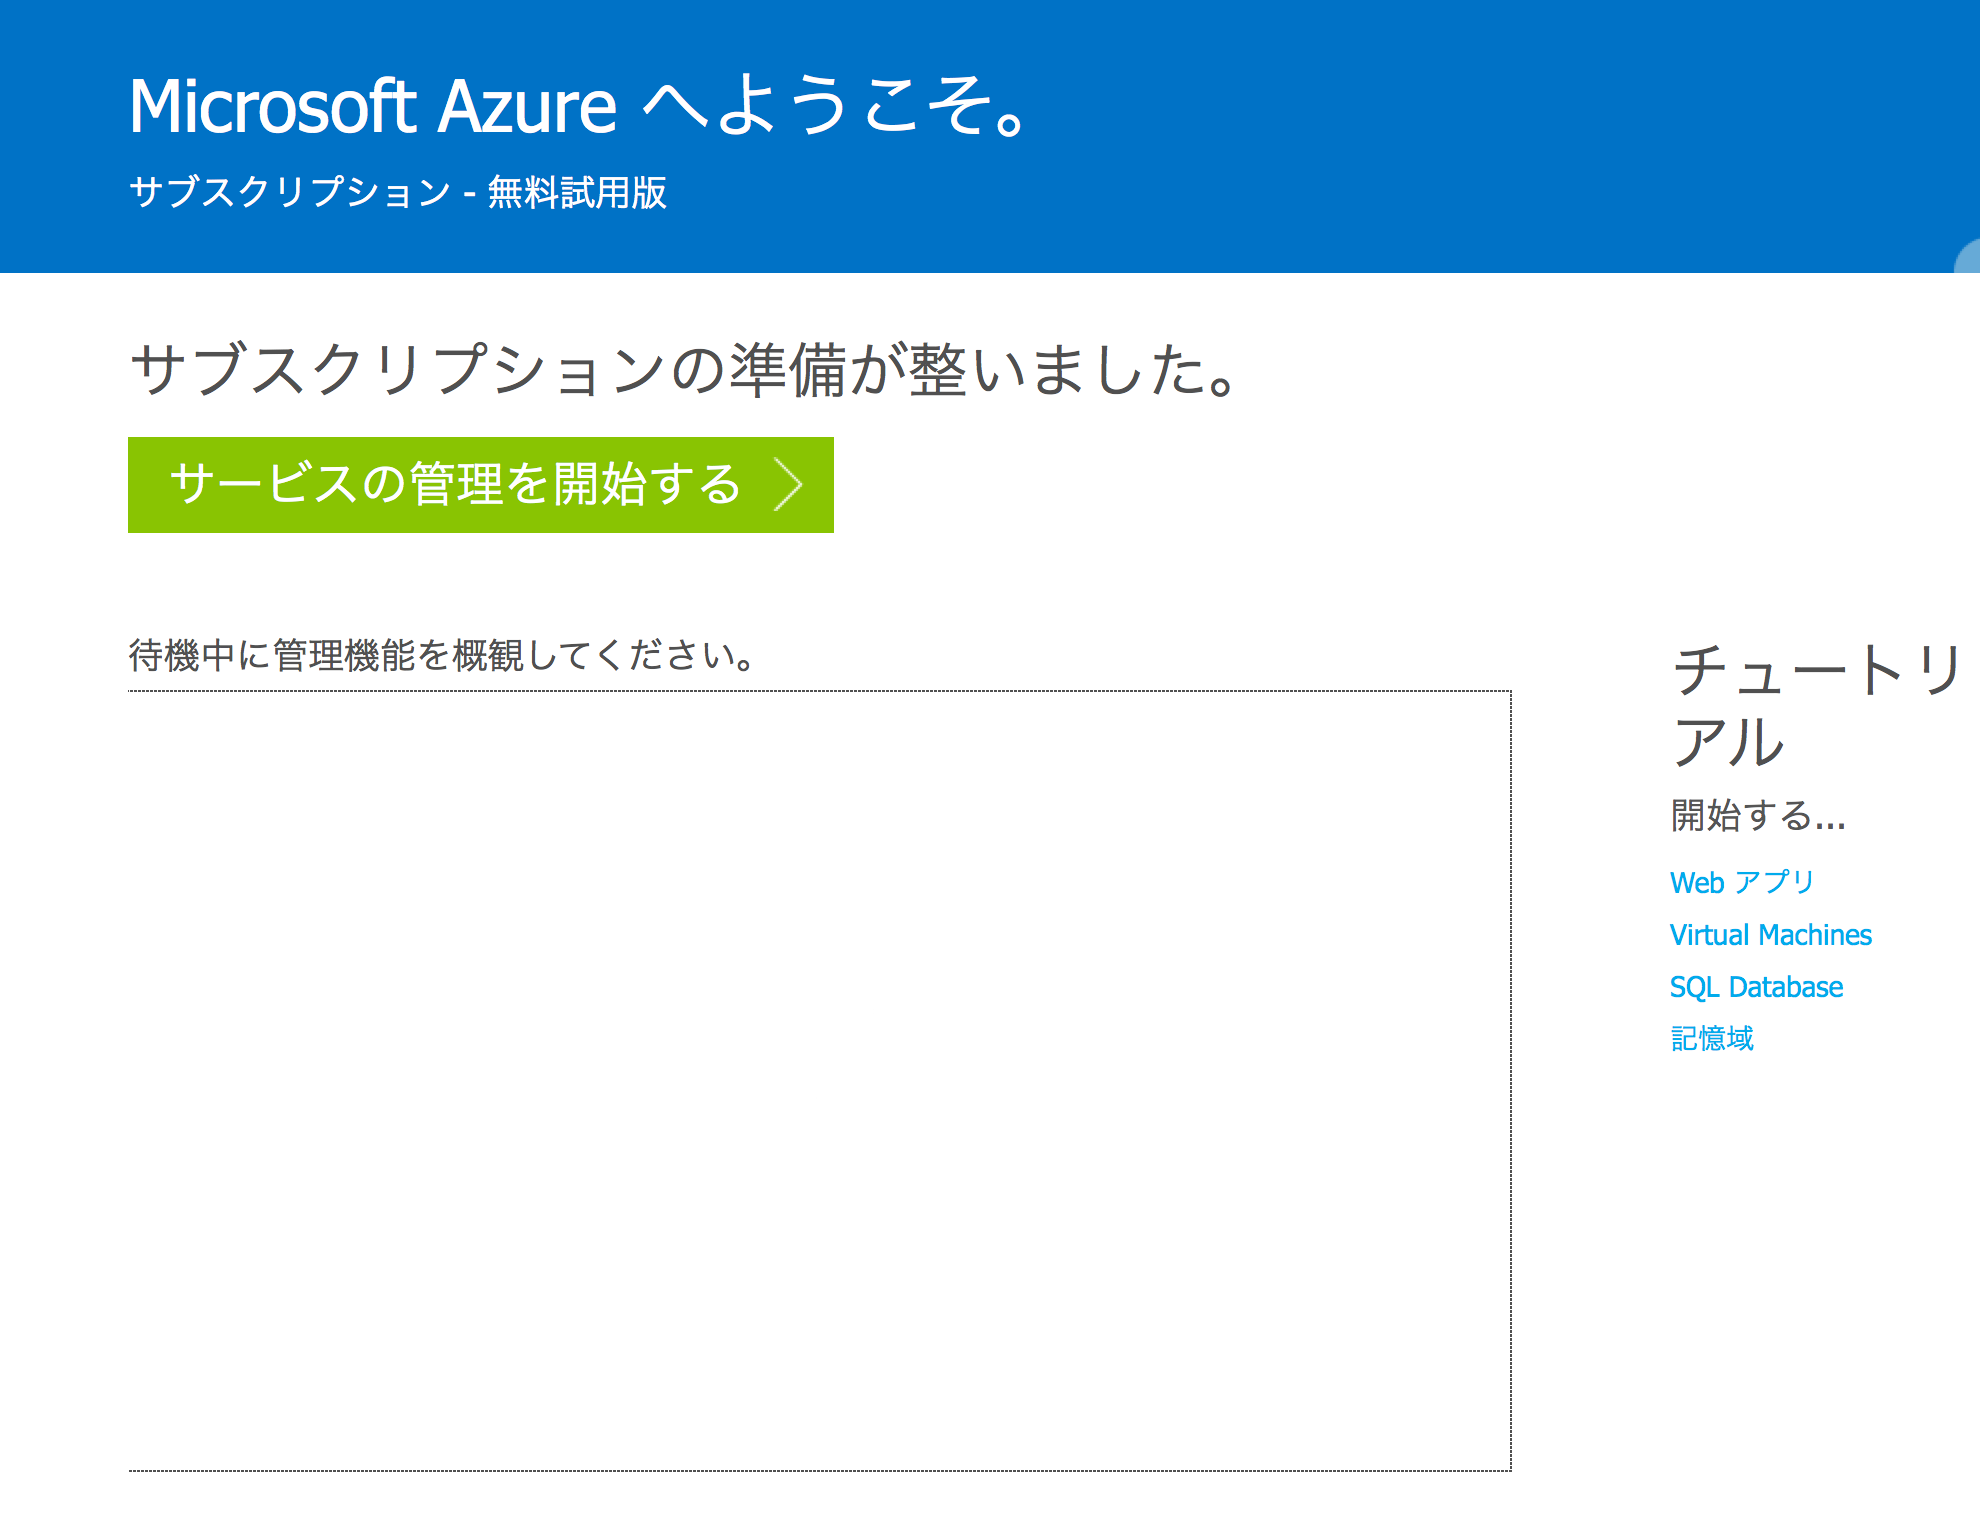
準備が完了すると[サービスの管理を開始する]をクリック
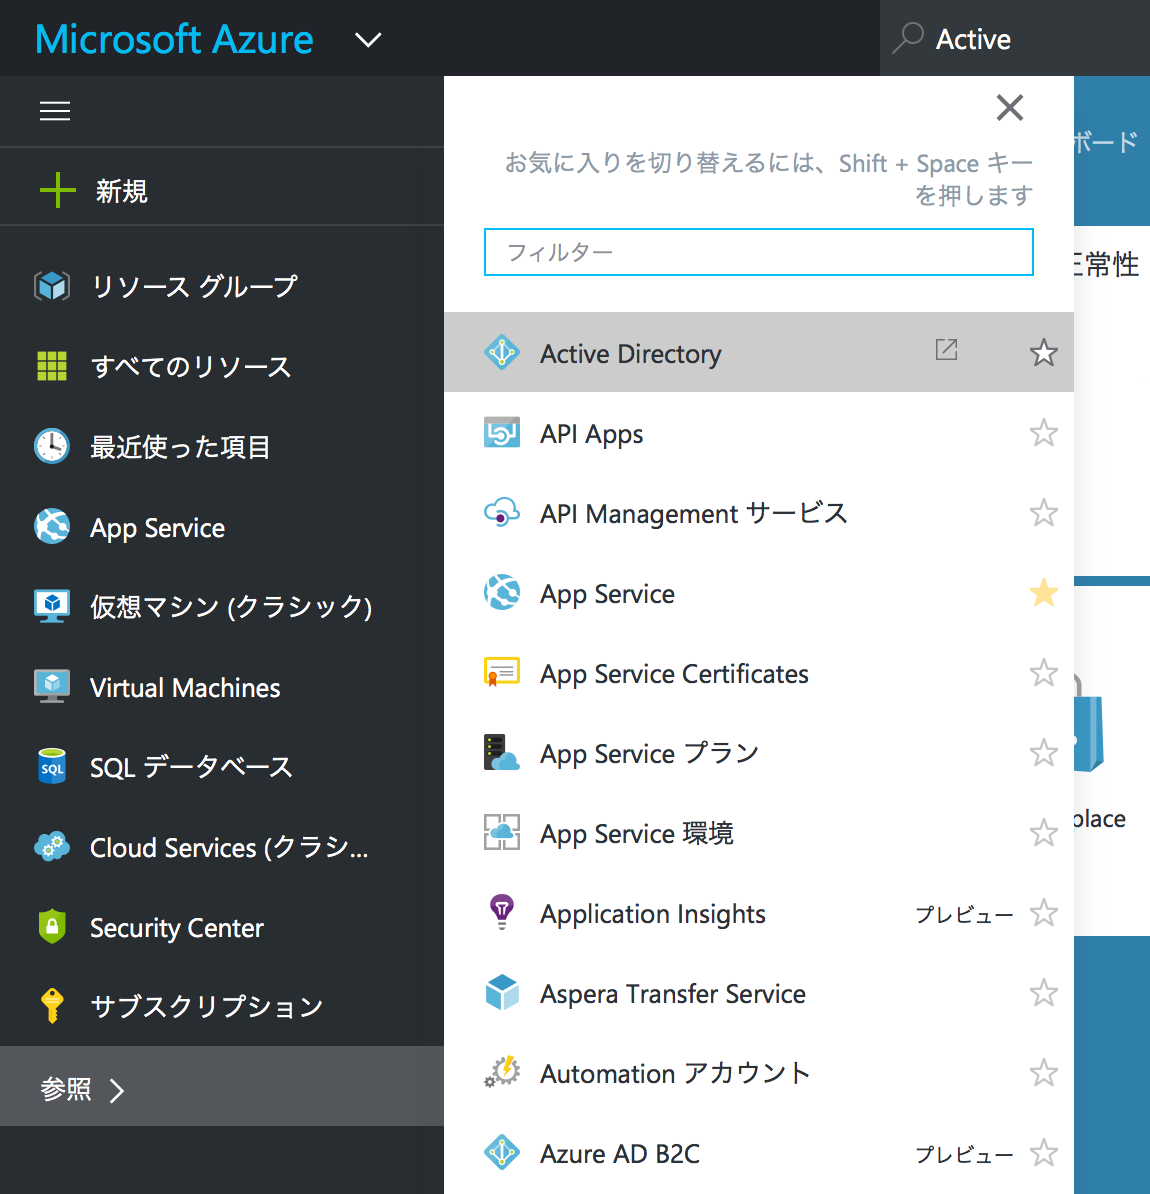
新しいAzureポータルが表示されます
Active Directoryを管理するためには[参照]から[Active Directory]を選択します。
旧ポータルが表示されるので、ツアーウィザードを終わらせます
既存のサブスクリプションにAzure ADを関連付ける手順は、「補足: Azure ADを既存のAzure ADサブスクリプションに接続する」を参照ください。
Azure ADディレクトリにアプリケーションを追加
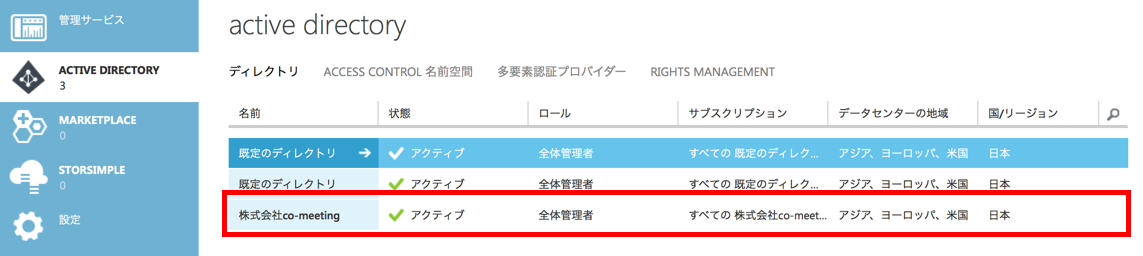
Azure旧ポータルで[Active Directory]を表示すると、Office 365が登録されているディレクトリを確認できます。
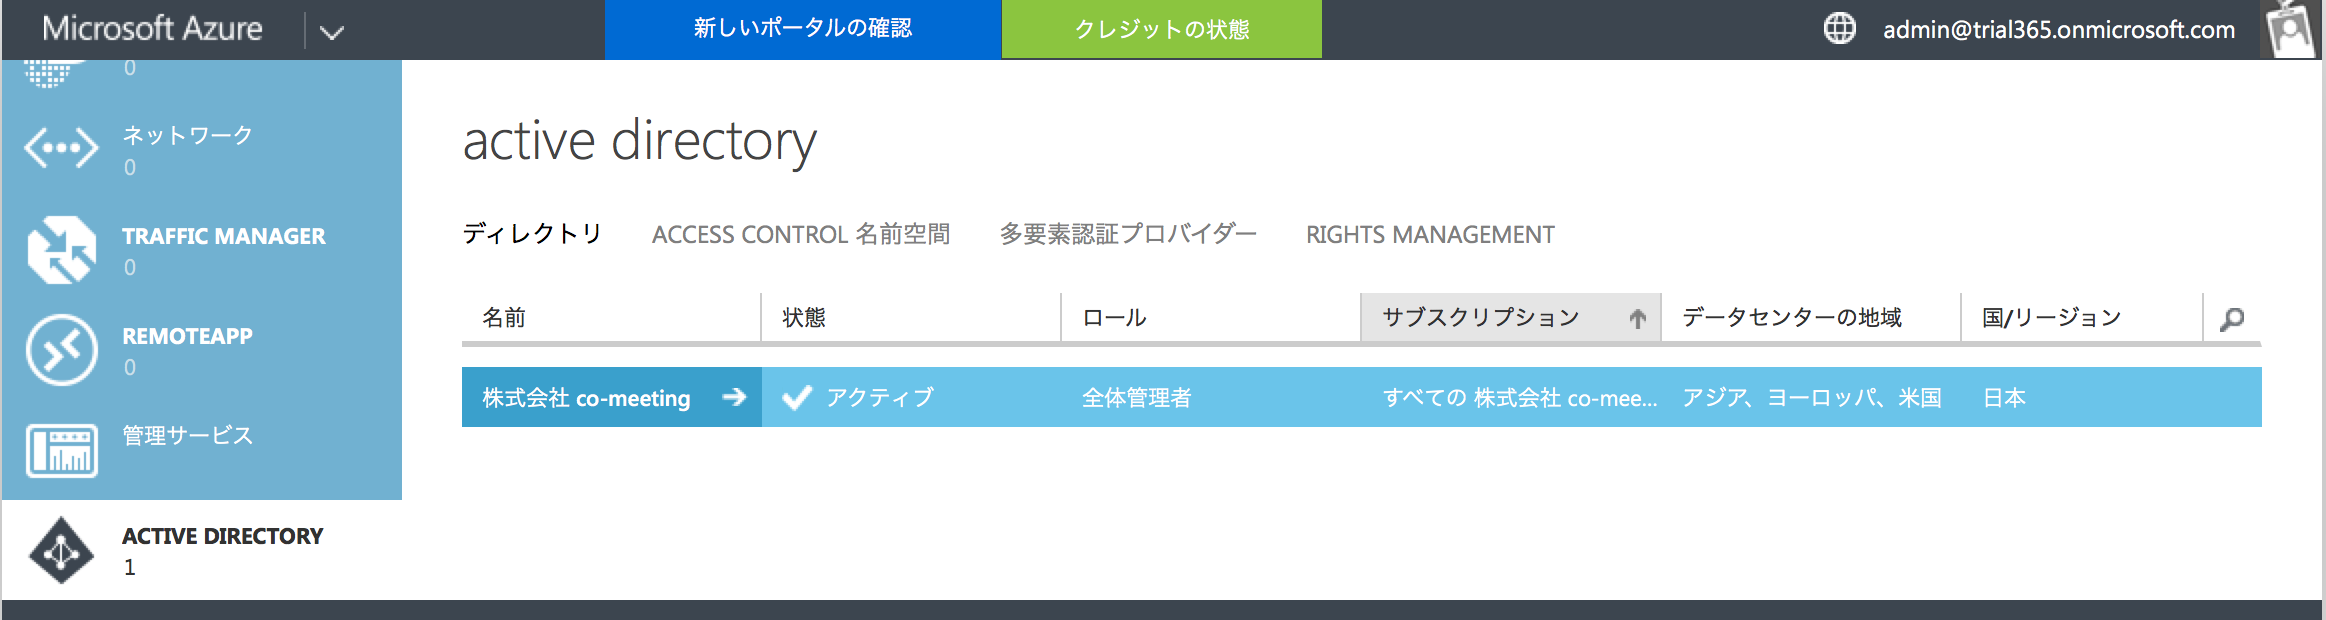
このディレクトリに、アプリケーションを追加します。
Manually Register an Office 365 API app in Azure AD(Office Dev Center)の手順に従って、Office 365のAzure ADにアプリを登録し、
クライアント ID とシークレットを生成するを実行して、アプリケーションのクライアントIDとシークレットを取得します。
ドメインをクリックして[アプリケーション]タブを選択します。

[追加]をクリックします。
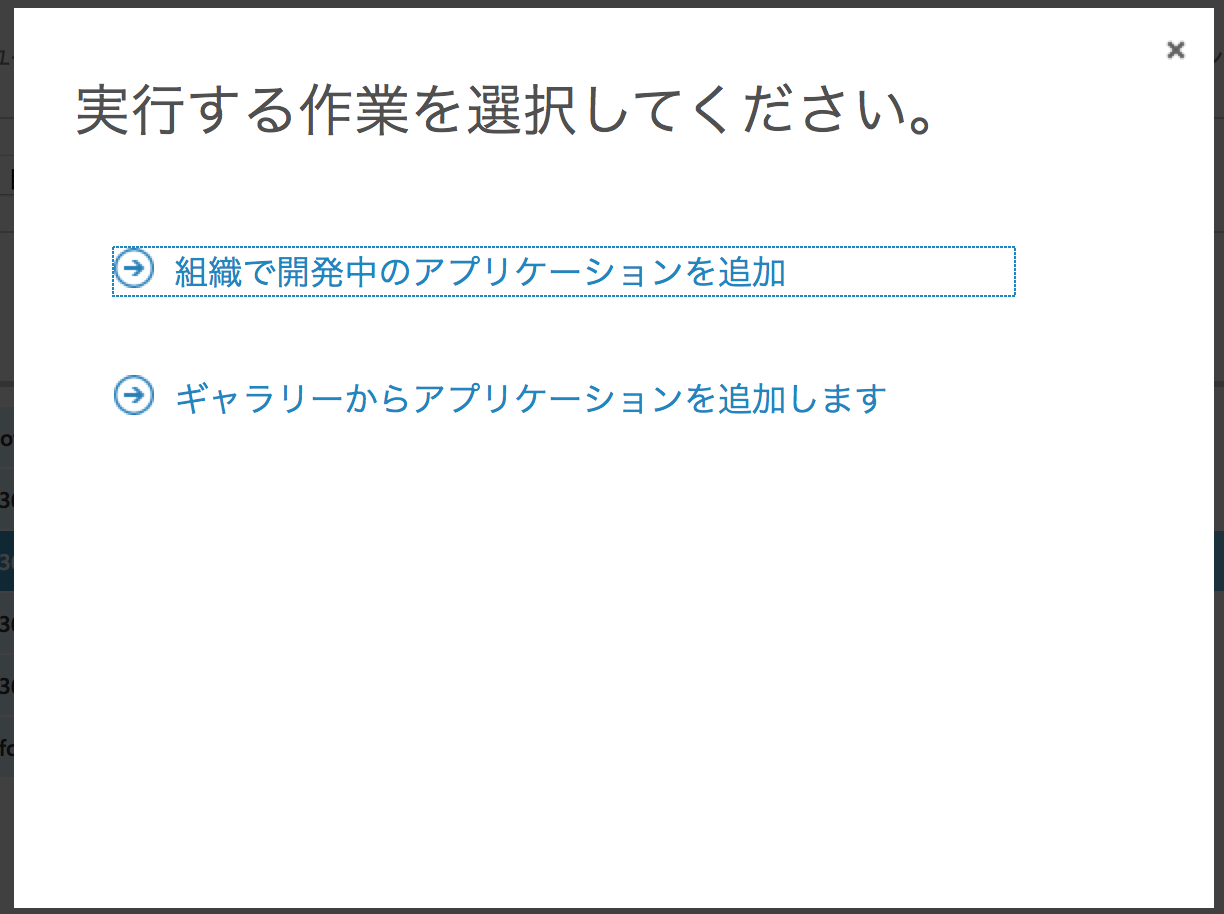
自分で開発するアプリケーションの場合は、[組織で開発中のアプリケーションを追加]を選択します

アプリケーションの名前を入力し、[WebアプリケーションやWEB API]を選択して->をクリックします
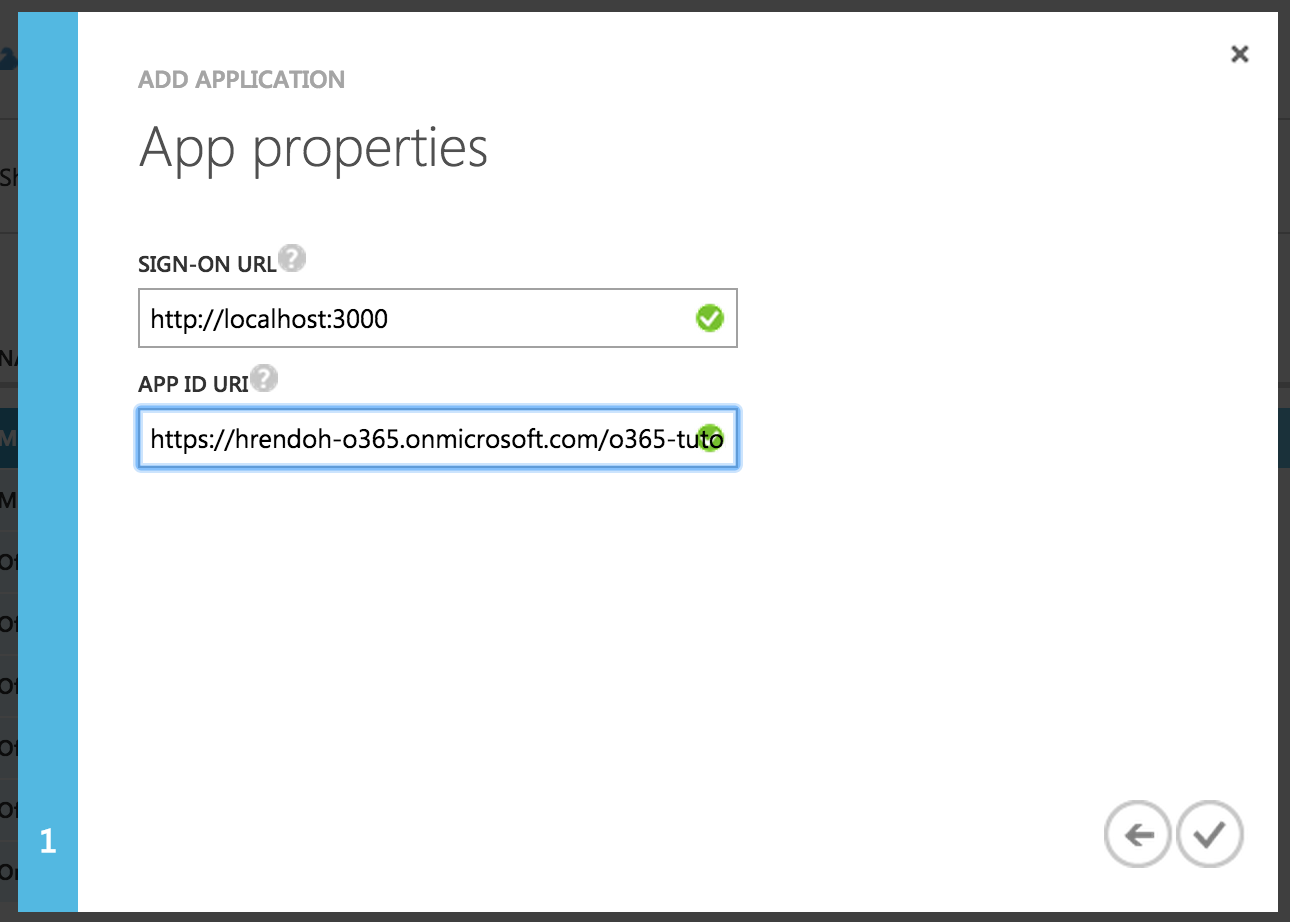
[サインオン URL]に「http://localhost:3000」、[アプリケーション ID / URL]は「https://
[アプリケーション ID /URL]は、URI形式かつディレクトリ内で一意であれば任意の値で問題ありません。
右下のチェックアイコンをクリックして保存します。
アプリケーションが追加されました。
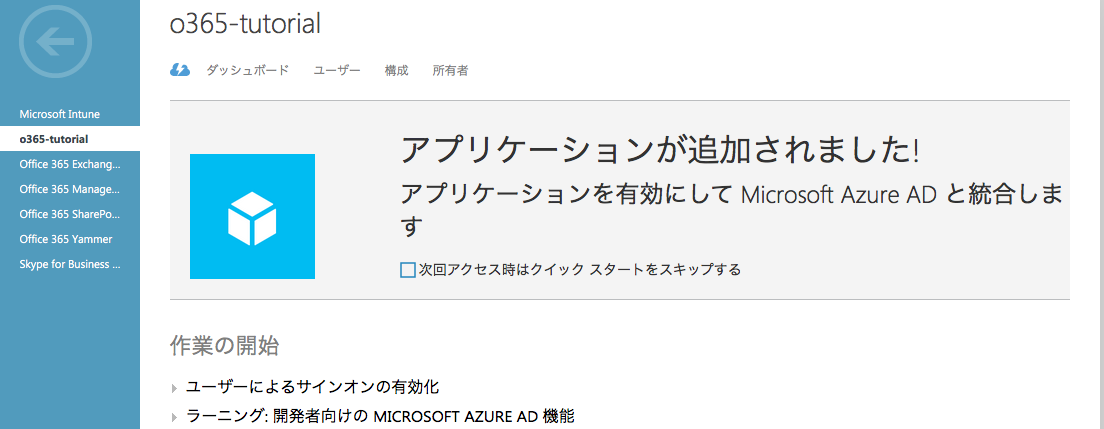
続いて、追加したアプリケーションの[構成]タブを開き、クライアントIDの確認、キーの生成およびOffice 365 Exchangeへのアクセス許可を設定していきます。
構成タブをスクロールするとクライアントIDが確認できます
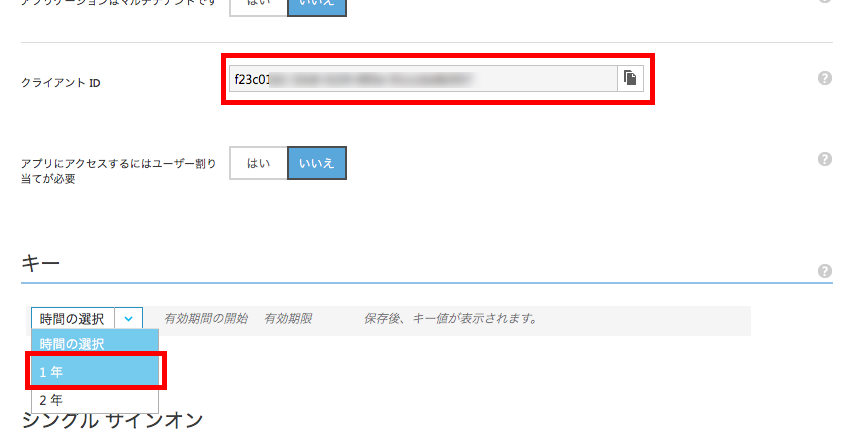
また、[キー]のプルダウンから[1 年]を選択して追加します
キーは、構成を保存すると生成されます
さらに、下までスクロールして、[他のアプリケーションに対するアクセス許可]の[アプリケーションの追加]ボタンをクリックします
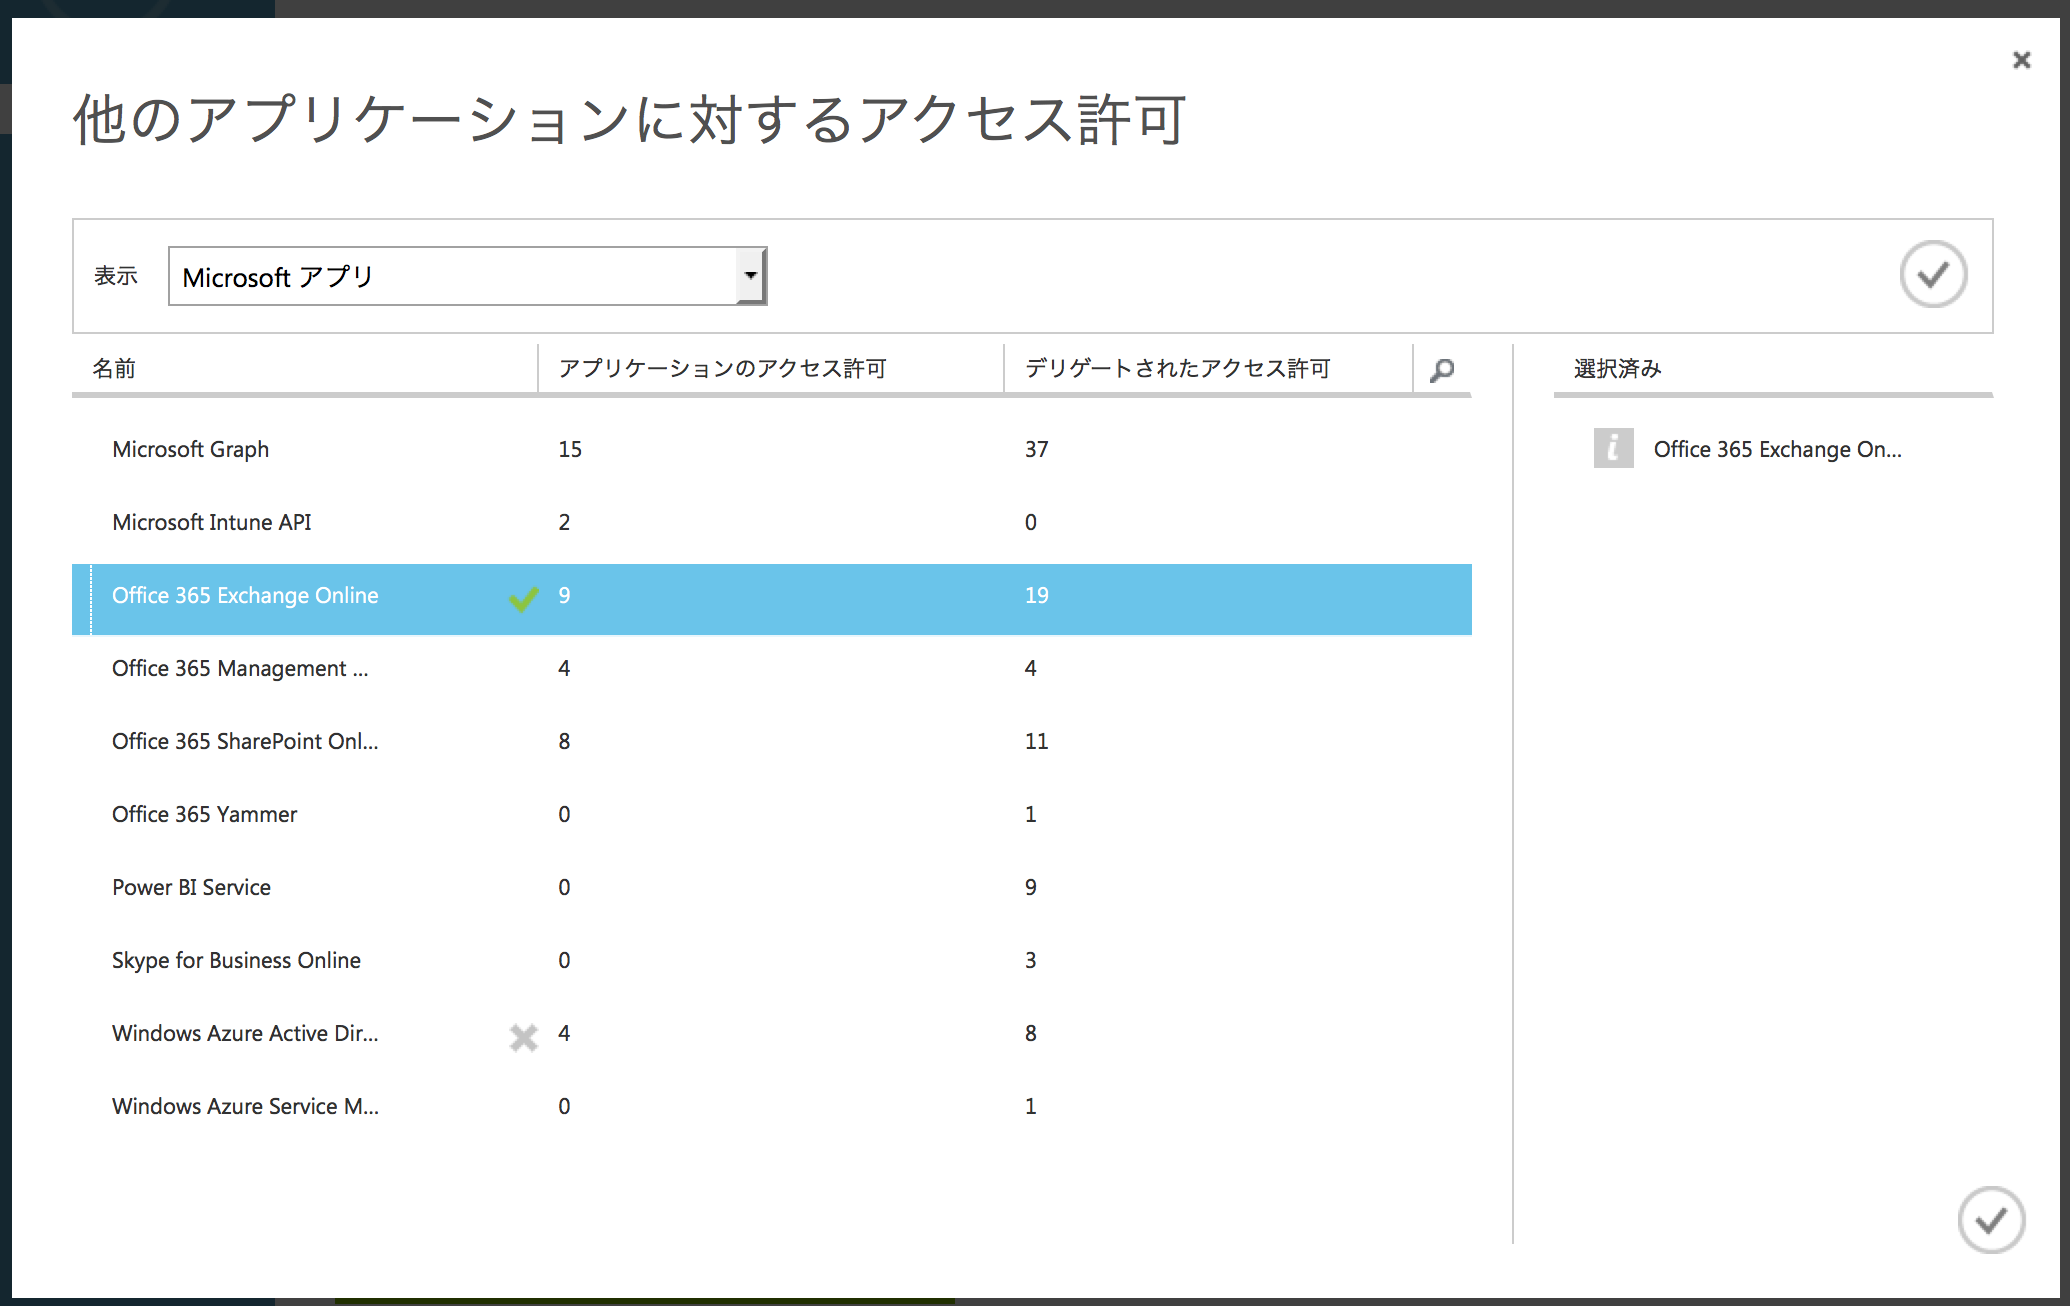
[Office 365 Exchange Online]を選択して、右下のチェックアイコンをクリックして保存します。
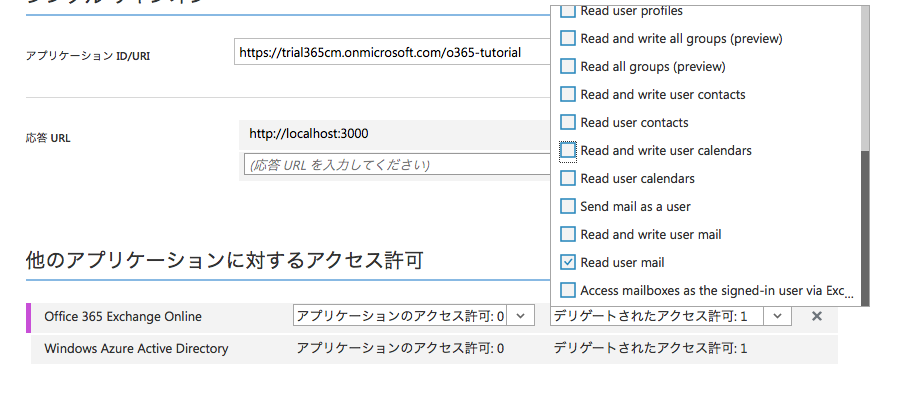
[Office 365 Exchange Online]の行[デリゲートされたアクセス許可]をクリックして[Read user mail]にチェックを入れます。
[保存]をクリックして設定を保存
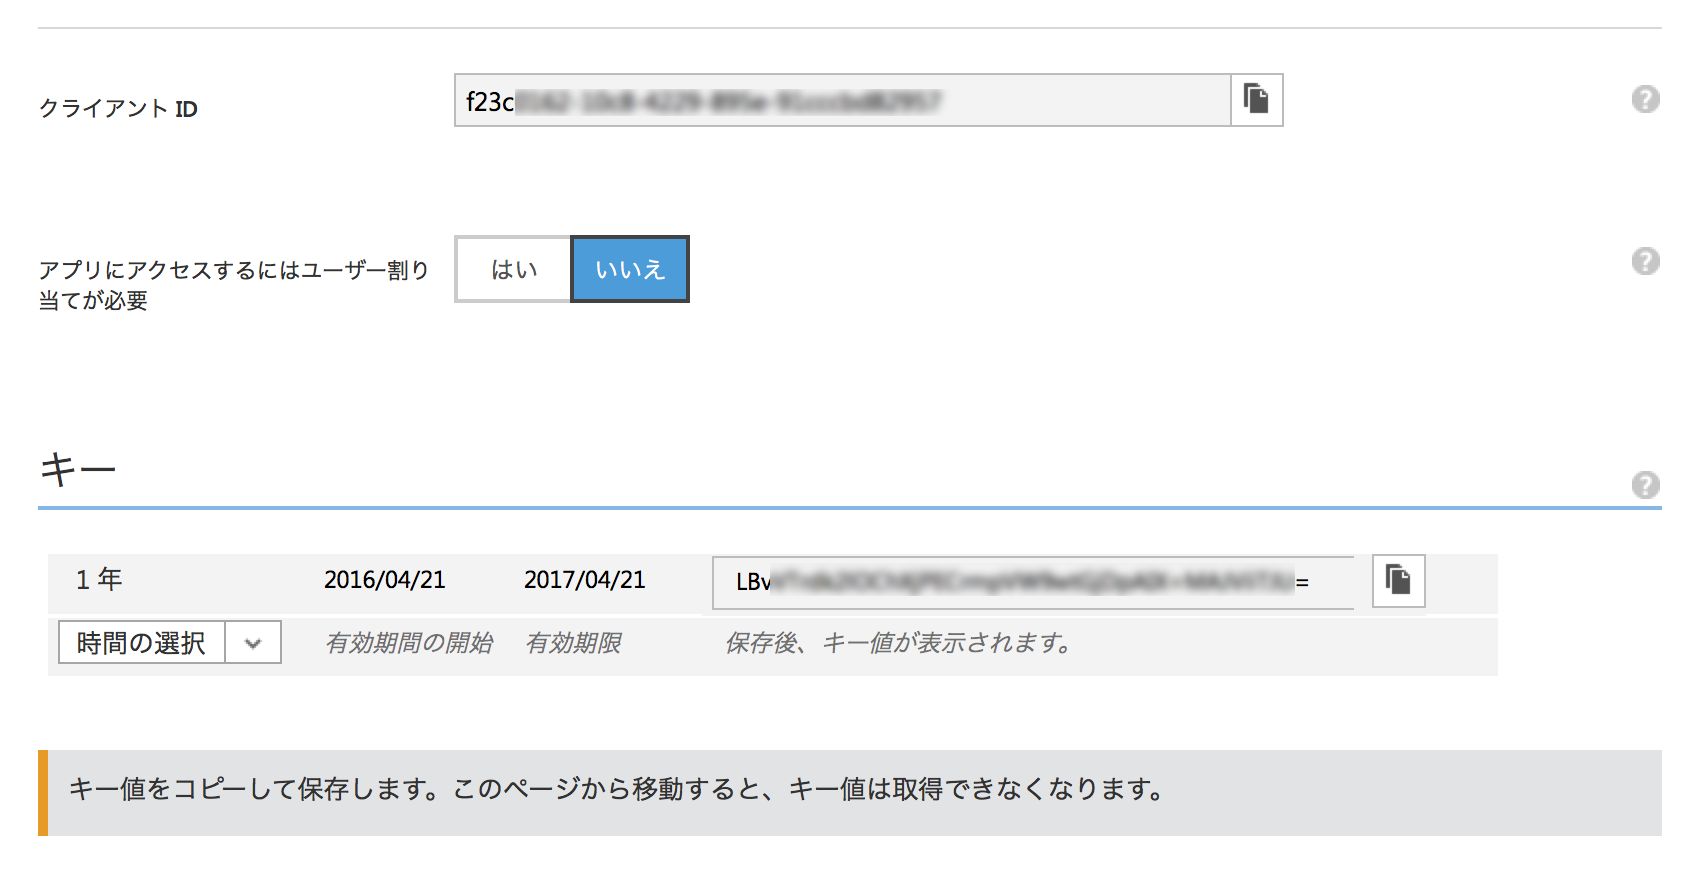
[キー]に生成され表示されます。
キーは生成直後のみ表示されるのでコピーして控えておきます。
以上で、Azure ADディレクトリへアプリを登録でき、実装に入る準備が整いました。
Railsアプリの作成
Railsプロジェクトを作成して、確認用にHttpサーバーを起動しておきます。
$ rails new o365-tutorial
$ cd o365-tutorial
$ rails server
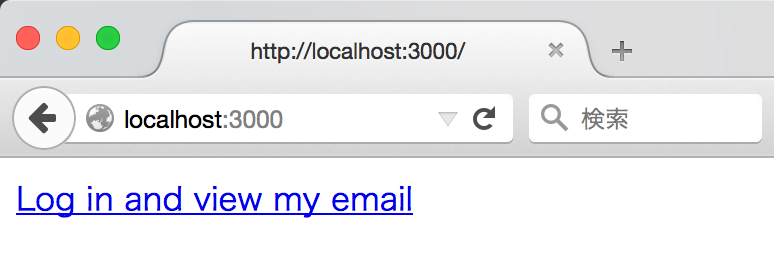
トップページの作成
Welcomeページの置き換え
ApplicationControllerにhomeアクションを追加
// app/controllers/application_controller.rb

class ApplicationController < ActionController::Base
  # Prevent CSRF attacks by raising an exception.
  # For APIs, you may want to use :null_session instead.
  protect_from_forgery with: :exception

  def home
    # Display the login link.
    render html: '<a href="#">Log in and view my email</a>'.html_safe
  end
end
homeアクションをrootに割り当て
// config/routes.rb

Rails.application.routes.draw do
  root 'application#home'
end
http://localhost:3000にアクセスして確認
OAuth2フローの実装
Gemfileにoauth2を追加し
// Gemfile
gem 'oauth2'
bundle i
nstallを実行
$ bundle install
OAuth2コー
ルバックを処理するコントローラーを追加します
$ rails generate controller Auth
[CONFIGURE]タブの[CLIEND ID]と[keys]に追加したシークレットの値をコピーして
CLIENT_IDとCLIENT_SECRETにセット
// app/helpers/auth_helper.rb

module AuthHelper

  # App's client ID. Register the app in Azure AD to get this value.
  CLIENT_ID = 'xxxxxxxxx-xxxx-xxxx-xxxx-xxxxxxxxx'
  # App's client secret. Register the app in Azure AD to get this value.
  CLIENT_SECRET = 'yyyyyyyyyyyyyyyyyyyyyyyyyyyyyyyyy/as='

  # Generates the login URL for the app.
  def get_login_url
    client = OAuth2::Client.new(CLIENT_ID,
                                CLIENT_SECRET,
                                :site => "https://login.microsoftonline.com",
                                :authorize_url => "/common/oauth2/authorize",
                                :token_url => "/common/oauth2/token")

    login_url = client.auth_code.authorize_url(:redirect_uri => authorize_url)
  end
end
16行目は、後で追加するルーティング/authorizeを指定
get_login_urlメソッドを追加したAuthHelperをApplicationControllerから呼び出すように修正
// app/controllers/application_controller.rb

class ApplicationController < ActionController::Base
  # Prevent CSRF attacks by raising an exception.
  # For APIs, you may want to use :null_session instead.
  protect_from_forgery with: :exception
  include AuthHelper

  def home
    # Display the login link.
    login_url = get_login_url
    render html: "<a href='#{login_url}'>Log in and view my email</a>".html_safe
  end
end
RIDIRECT_URLに指定した/authorizeアクションを次に実装していきます
ルーティングを追加
// config/routes.rb
Rails.application.routes.draw do
  root 'application#home'
  get 'authorize' => 'auth#gettoken'
end
Authヘルパーにアクセストークンを取得するメソッドを追加します
// app/helpers/auth_helper.rb

module AuthHelper
  ...
  # Exchanges an authorization code for a token
  def get_token_from_code(auth_code)
    client = OAuth2::Client.new(CLIENT_ID,
                                CLIENT_SECRET,
                                :site => "https://login.microsoftonline.com",
                                :authorize_url => "/common/oauth2/authorize",
                                :token_url => "/common/oauth2/token")

    token = client.auth_code.get_token(auth_code,
                                       :redirect_uri => authorize_url,
                                       :resource => 'https://outlook.office365.com')

    access_token = token.token
  end
end
アクションをコントローラに実装
// app/controllers/auth_controller.rb

class AuthController < ApplicationController
  def gettoken
    token = get_token_from_code params[:code]
    render text: token
  end
end
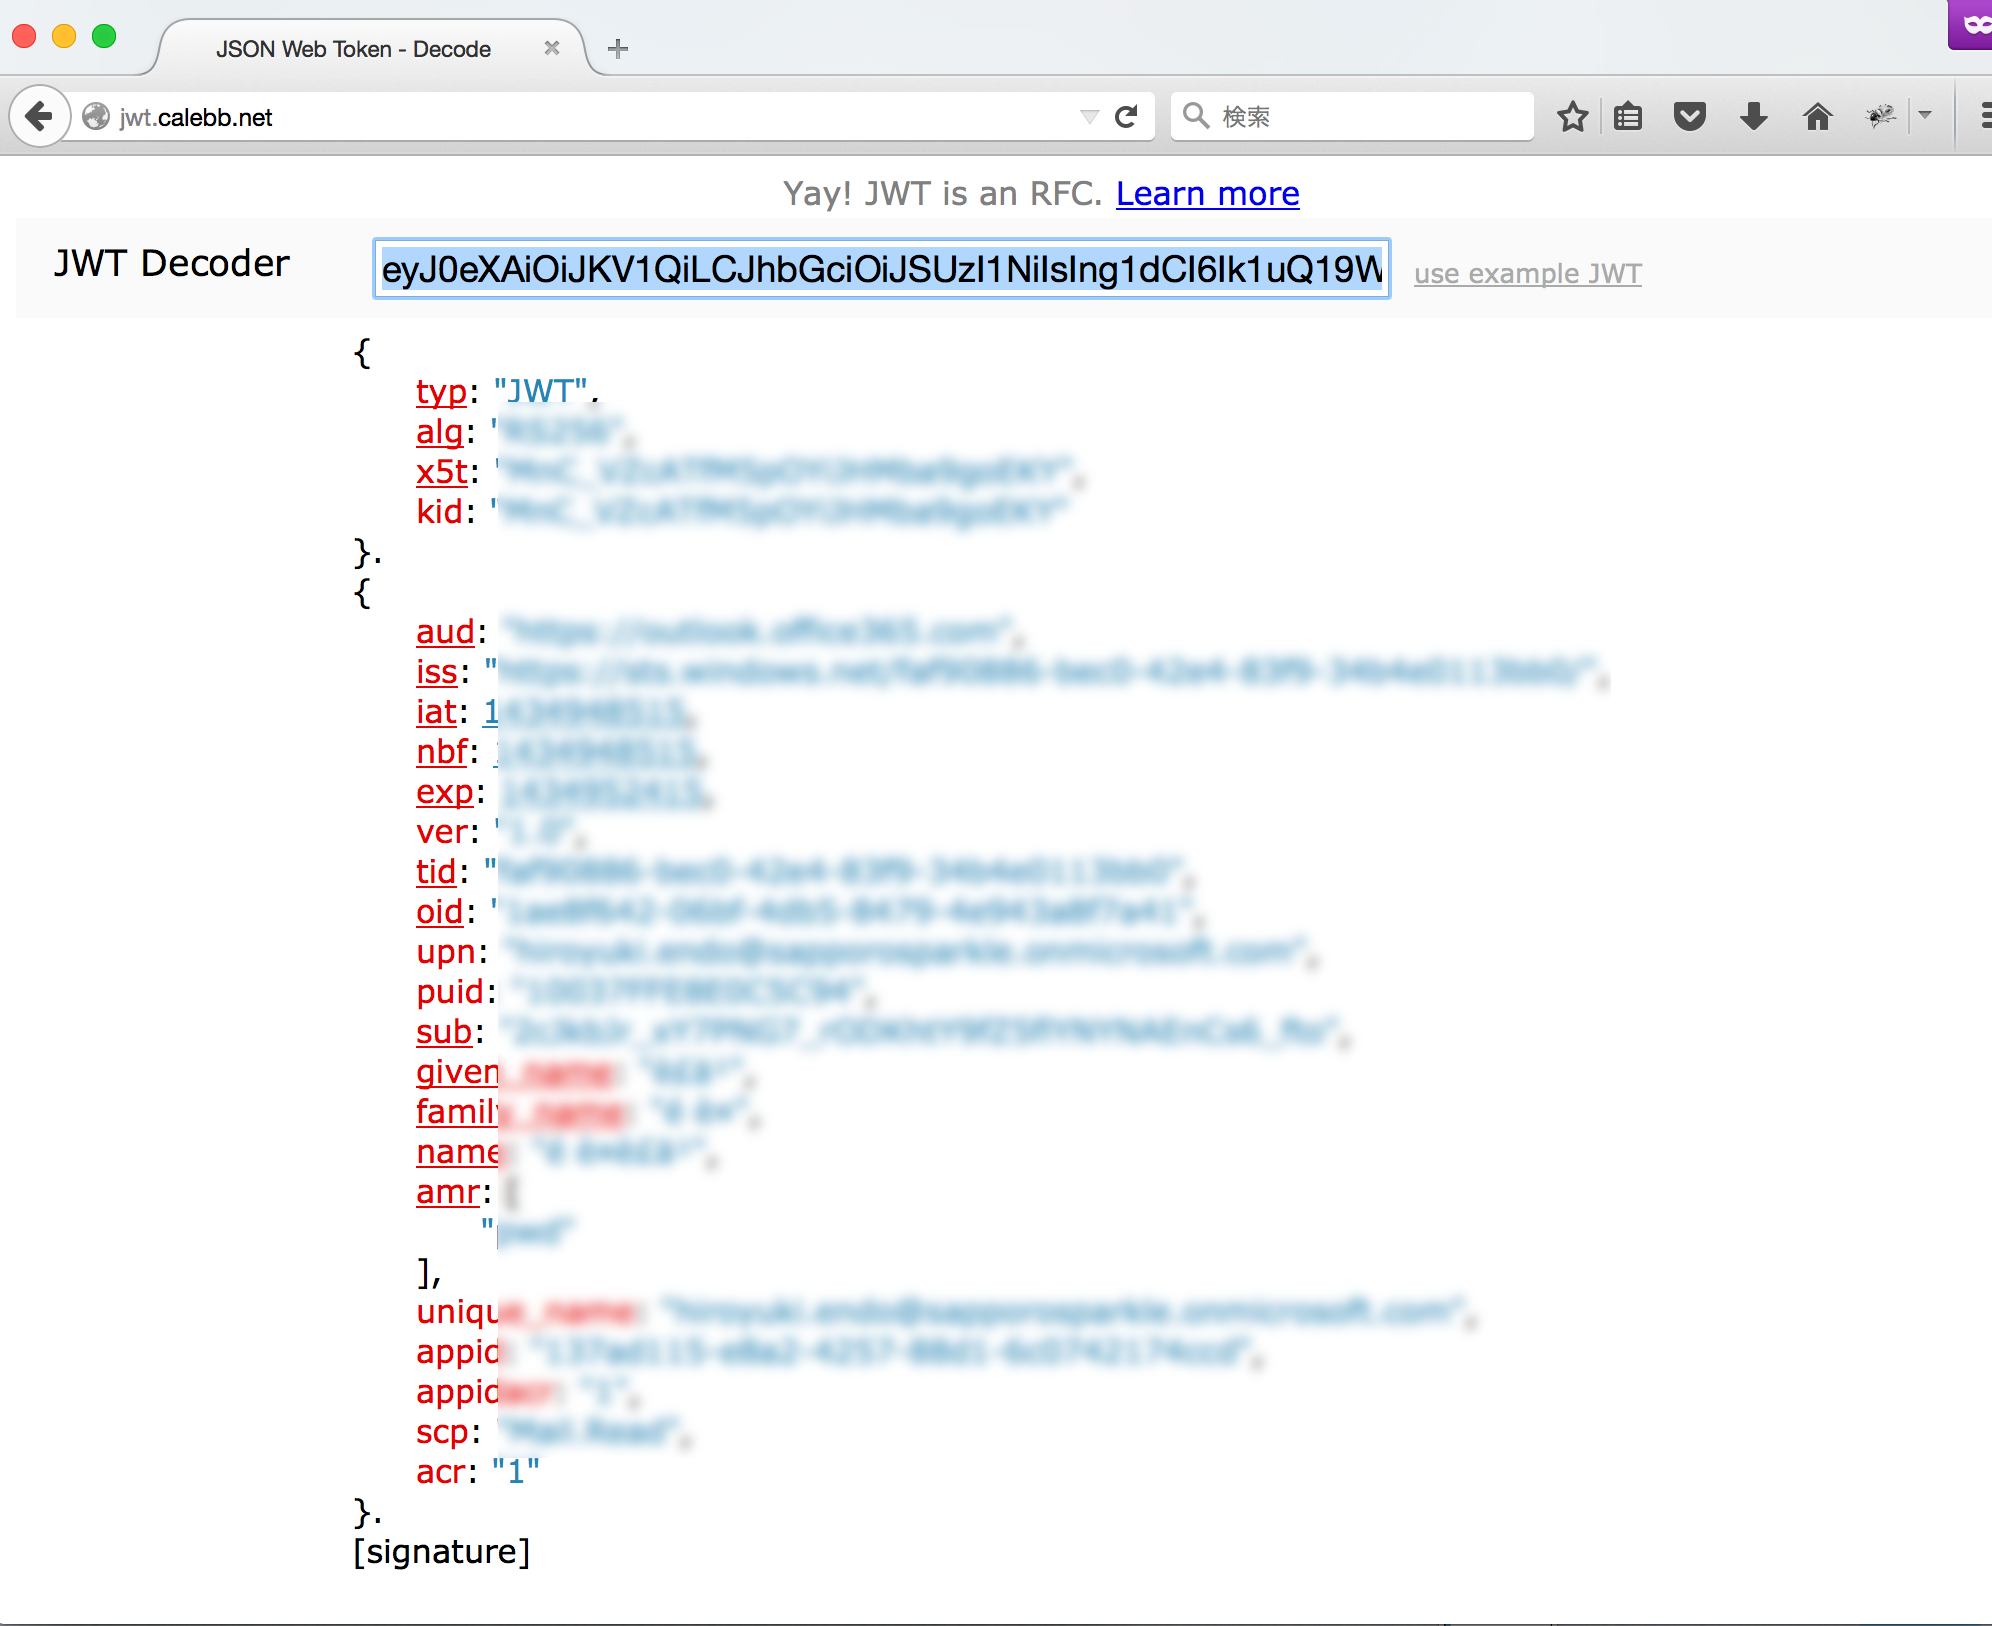
http://localhost:3000にアクセスして、Office 365アカウントでサインインすると以下のようにアクセストークンが取得できます

表示された文字列をコピーし、http://jwt.calebb.net/でアクセストークンを検証してみると、以下のようにログインしたユーザーの情報を含むJSONを確認できます
アクセストークンでREST APIを呼び出す
アクセストークンの取得ができたので、実際にOffice 365 REST APIにアクエスしてOutlookのメールを取得するコードを実装していきます。
メール操作用のコントローラを作成
$ rails generate controller Mail index
アクセストークンをセッションに入れて、MainController#indexへリダイレクトするようにAuth#gettokenアクションを修正
// app/controllers/auth_controller.rb

class AuthController < ApplicationController
  def gettoken
    token = get_token_from_code params[:code]
    session[:azure_access_token] = token
    redirect_to mail_index_url
  end
end
faradayをGemfileに追加して、bundle installする
faradayはREST API用の呼び出しに使うHttp Client
// Gemfile"]
gem 'faraday'
$ bundle install
MailControllerのindexアクションを実装
// app/controllers/mail_controller.rb

class MailController < ApplicationController
  def index
    token = session[:azure_access_token]
    if token
      # If a token is present in the session, get messages from the inbox
      conn = Faraday.new(:url => 'https://outlook.office365.com') do |faraday|
        # Outputs to the console
        faraday.response :logger
        # Uses the default Net::HTTP adapter
        faraday.adapter  Faraday.default_adapter
      end

      response = conn.get do |request|
        # Get messages from the inbox
        # Sort by DateTimeReceived in descending orderby
        # Get the first 20 results
        request.url '/api/v1.0/Me/Messages?$orderby=DateTimeReceived desc&$select=DateTimeReceived,Subject,From&$top=20'
        request.headers['Authorization'] = "Bearer #{token}"
        request.headers['Accept'] = "application/json"
      end

      # Assign the resulting value to the @messages
      # variable to make it available to the view template.
      @messages = JSON.parse(response.body)['value']
    else
      # If no token, redirect to the root url so user
      # can sign in.
      redirect_to root_url
    end
  end
end
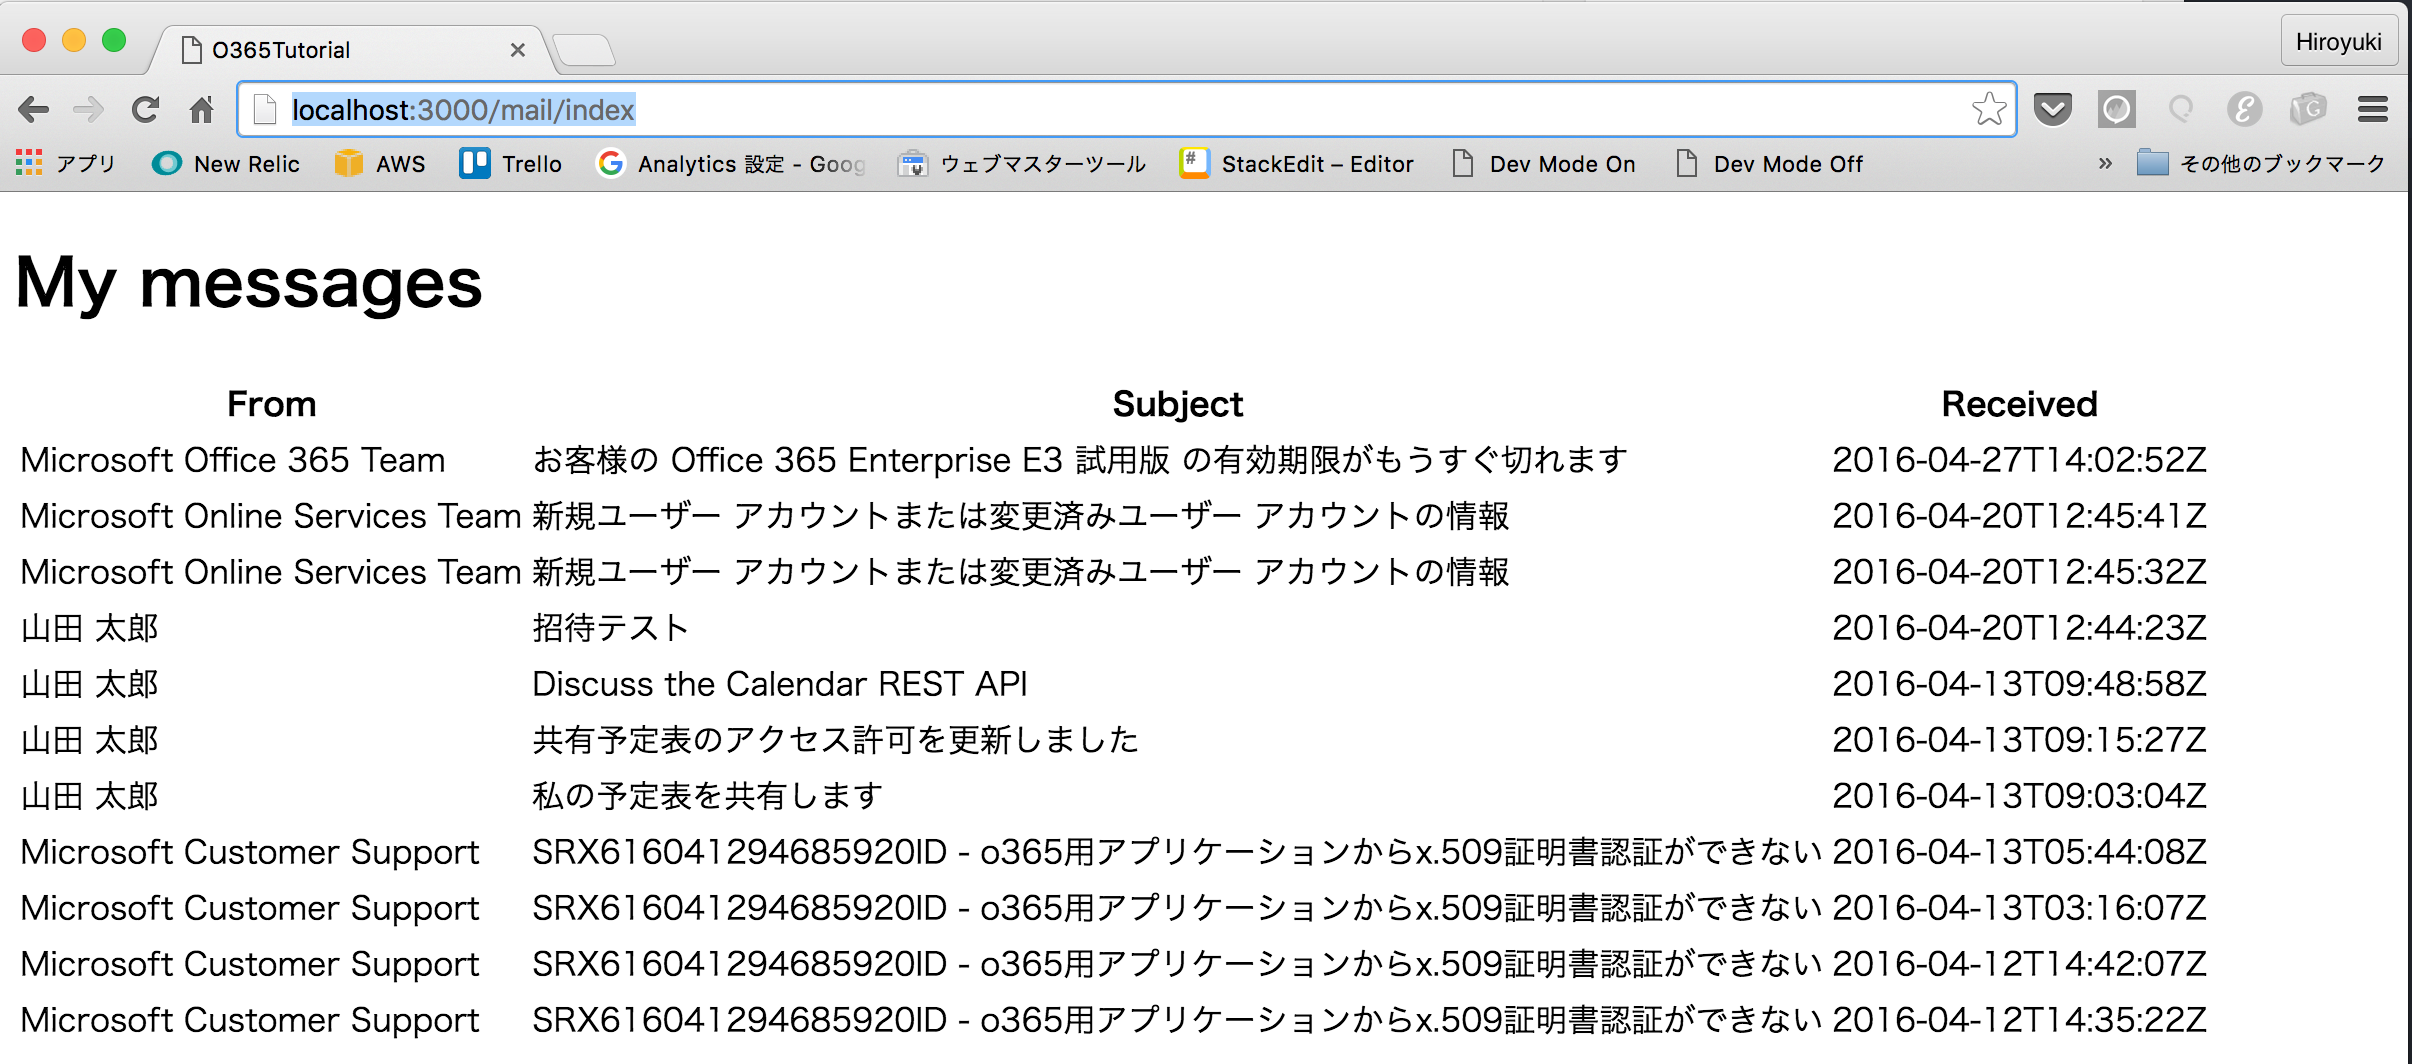
ビューは以下のとおり
// app/views/mail/index.html.erb

<h1>My messages</h1>
<table>
  <tr>
    <th>From</th>
    <th>Subject</th>
    <th>Received</th>
  </tr>
  <% @messages.each do |message| %>
    <tr>
      <td><%= message['From']['EmailAddress']['Name'] %></td>
      <td><%= message['Subject'] %></td>
      <td><%= message['DateTimeReceived'] %></td>
    </tr>
  <% end %>
</table>
再度、http://localhost:3000にアクセスし認証すると、以下のようにメール一覧が表示されます
この後は、ログインユーザーのアクセストークン、更新トークンを保存して、更新トークンによるアクセストークンの再取得などを実装する必要があります。
補足: Azure ADを既存のAzure ADサブスクリプションに接続する
今回は、Office 365アカウントで新規にAzureサブスクリプションを登録しましたが、既存のAzureサブスクリプションにディレクトリにOffice 365のディレクトリを紐付けることができます。
公式ドキュメントでは、Azure サブスクリプションを Azure Active Directory に関連付ける方法のAzure での Office 365 サブスクリプションのディレクトリの管理 「Microsoft アカウントを使用する Azure のサブスクリプションがある場合」に説明があります。
Azure クラシックポータルで、[ディレクトリ] > [カスタム作成]をクリック
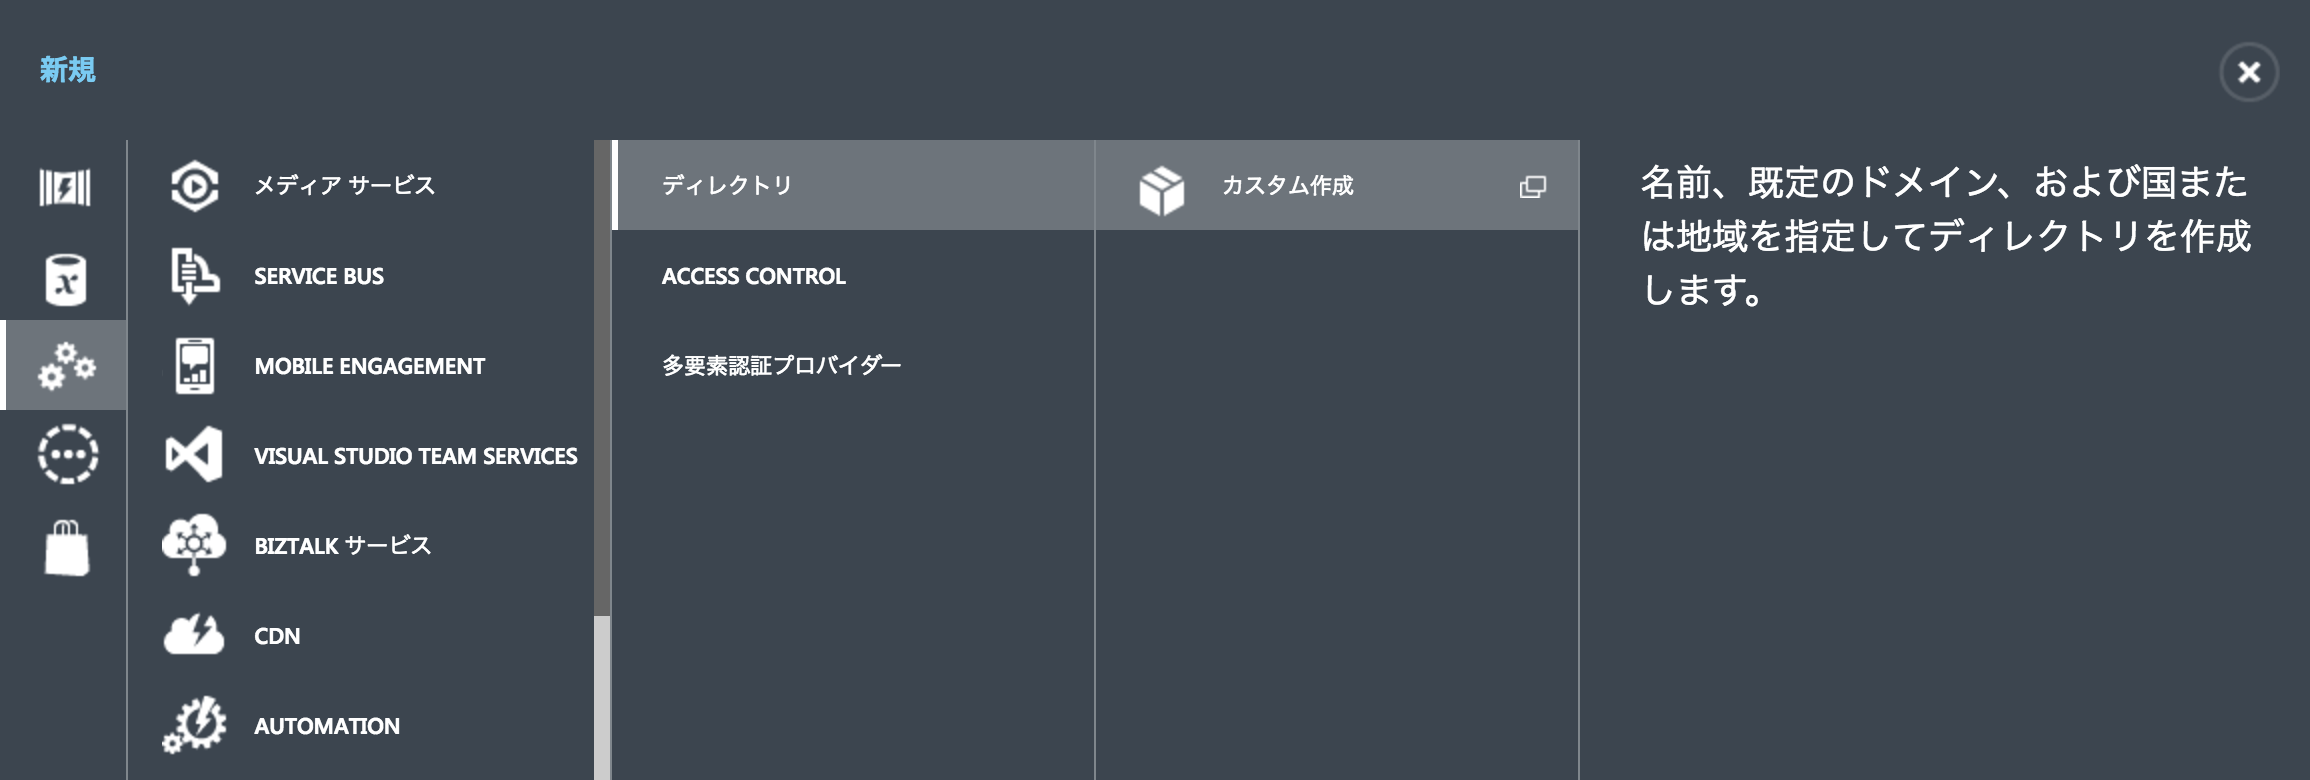
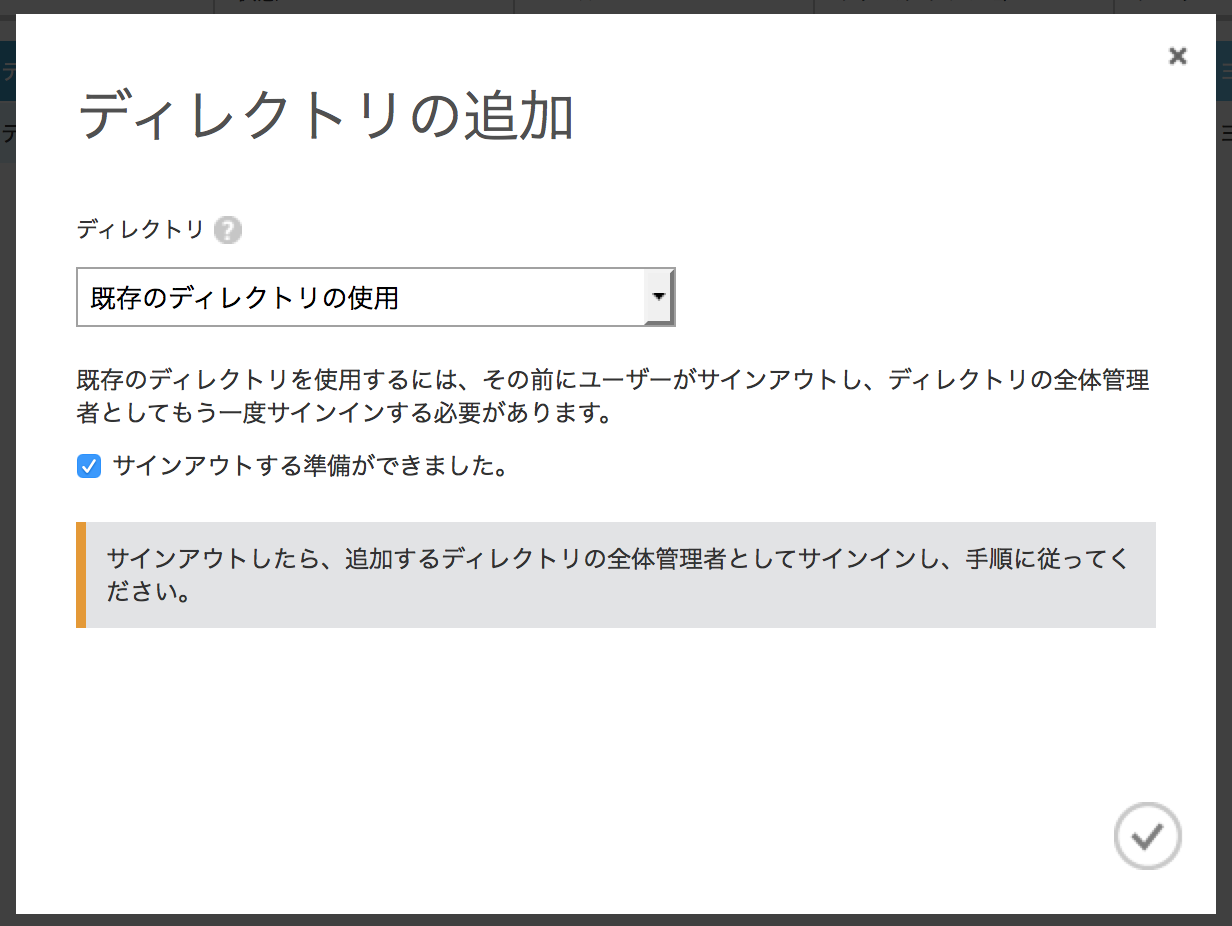
ディレクトリ [既存のディレクトリを使用]を選択して、[サインアウトする準備ができました]をチェックして右下のチェックアイコンをクリック
Azure サブスクリプションアカウントをサインアウトします
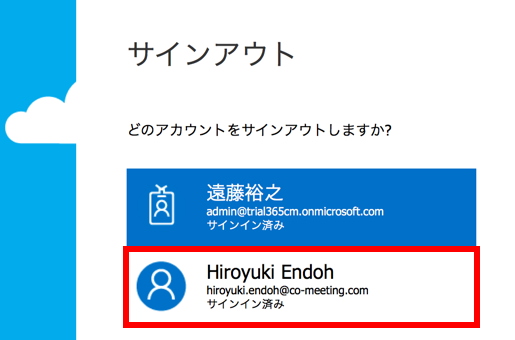
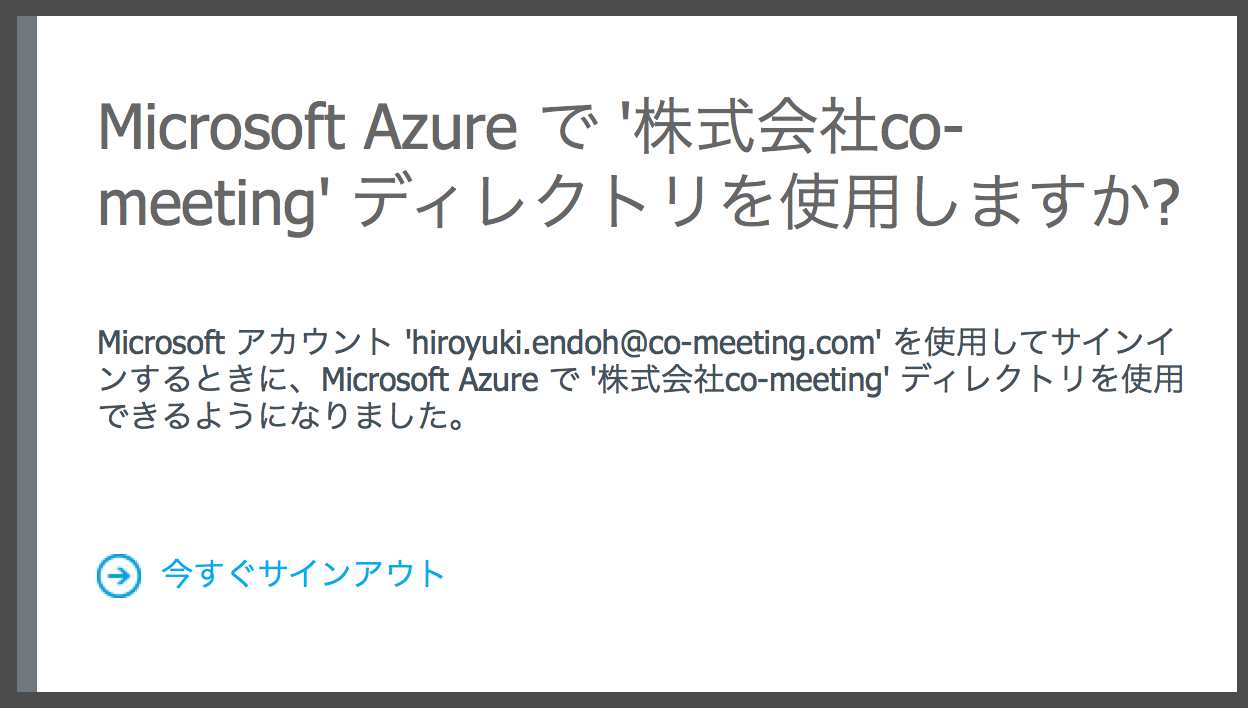
Office 365組織の管理者アカウントでログインし直すと、以下の画面が表示されます

[続行]をクリック
サインアウト後、Azureサブスクリプション アカウントでログインし直すと、Office 365ドメインが追加されていることが確認できます