Force.comは、iOS、Android向けの、ネイティブ、ハイブリッドおよびモバイルブラウザ向けHTML5アプリケーションの開発環境とSalesforce Mobile SDKがあり、mBaaSとしても充実しています。
この記事は、APEXやVisualForcePageなど、Force.comがプラットフォームとして用意しているアプリケーション開発環境のコアなところを活かしつつ実用的なモバイルアプリケーションを素早く作成する手法として、iOS向けハイブリッドアプリケーションの開発について調べたことをまとめました。
ハイブリッドアプリケーション用のSalesforce Mobile SDKは、Apache Cordovaのプラグインとして提供されています。
そのため、開発にはCordovaの基本的な知識が必要となります。
Cordovaについては、前回の記事「Apache CordovaによるPush通知の実装 iOS版」を参照ください。
また、Cordovaは通常、アプリ内にhtmlやjsなどのアセットを含めてビルドしますが、ハイブリッドリモートという構成をとると、VisualForcePageなど従来からのサーバーサイドレンダリングの仕組みを活用することができます。
そこで、この記事では、iOS向けハイブリッド、かつハイブリッドリモートという構成のアプリケーションを作成するための手順について説明していきます。
iOS版のハイブリッドアプリの開発をさっと試すには、公式ドキュメントの「Getting Started with iOS Hybrid」が参考になります(対応する日本語記事も会ったような気がしたが見つからない)。こちらも併せて参照ください。
前提条件
Salesforce Mobile SDKで、iOS向けハイブリッドアプリを開発するには、以下のような環境や知識が必要です
- Force.com開発の基本的な知識
- node.jsコマンドを実行可能な環境
- Apache Cordovaの実行環境と基礎的な知識
- アプリを実機にインストールするためのXCodeとその操作に関する知識
この記事では、これらの内容については、扱いません。
接続アプリケーションの作成
モバイルアプリケーションの認証はOAuthを利用しますので、接続アプリケーションを作成してOAuthの設定を追加します。
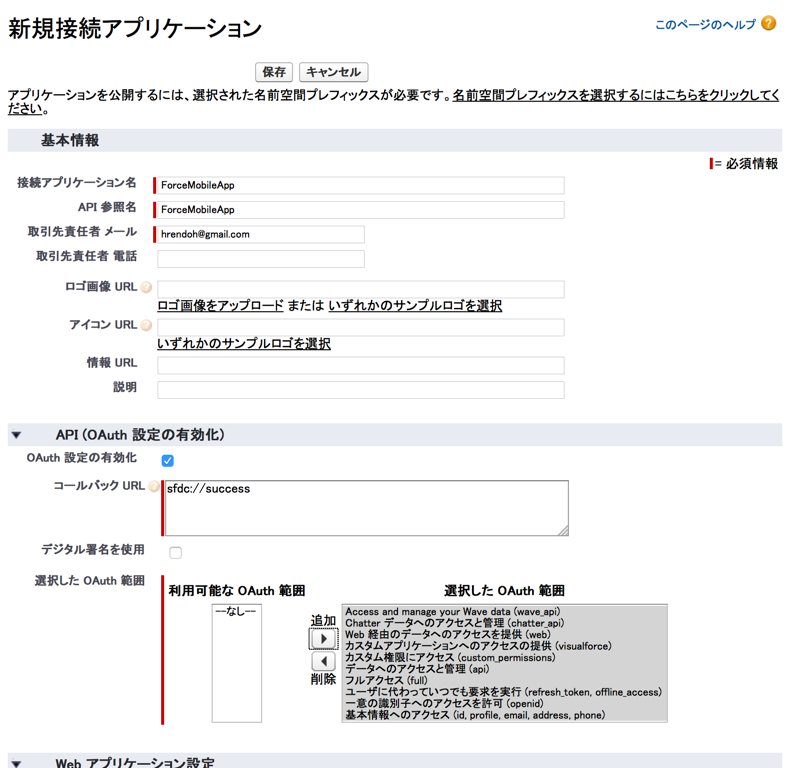
[設定] > [作成] > [アプリケーション] を開いて、[接続アプリケーション]の[新規]ボタンをクリックします。
[新規接続アプリケーション]画面で以下を入力して[保存]します。
- [接続アプリケーション]、[API 参照名]、[取引先責任者 メール]を適用に入力します
- [API (OAuth 設定の有効化)]の[OAuth 設定の有効化]にチェックをいれます
- [コールバック URL]に
sfdc://successと入力します - [選択した OAuth 範囲]で[利用可能な OAuth 範囲]のリストすべてを[選択した OAuth 範囲]に追加します
[接続アプリケーションを使用する前に、サーバ上で変更が有効になるまで 2 ~ 10 分お待ちください。]と表示される画面で[次へ]をクリックすると作成された接続アプリケーションの詳細を確認できます。
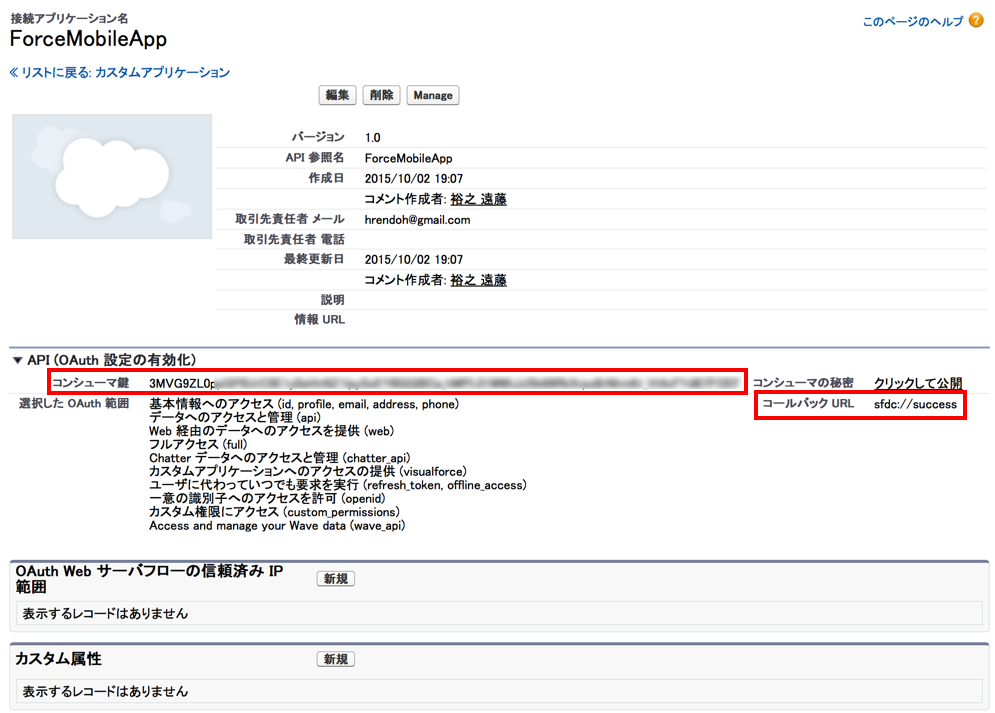
[コンシューマ鍵]と[コールバックURL]は次のプロジェクトの作成のパラメータとして使います。
プロジェクトの作成
ハイブリッド用のMobile SDKはnpmパッケージとして公開されているので、以下のコマンドでインストールできます。
$ sudo npm install forceios -g
プロジェクトの作成は、forceios createコマンドを実行します。
必要なパラメータを、対話形式で入力していきます。
- your application type: hybrid_remoteを選択
- your application name: 適当なアプリケーションの名前を入力
- the output directory for your app: application nameで入力したディレクトリが作成されるので未入力(カレントディレクトリ)のまま
- the package name for your app: iOSアプリであればBundle IDにセットする値を入力、ただし、Cordovaの制限で-(ハイフン)と大文字が使えない?
- the start page for your app: アプリで最初に呼び出されるVisualForcePageのパスを指定、
/apex/indexを入力(管理パッケージの場合は、__index) - your Connected App ID: 作成した接続アプリケーションのコンシューマ鍵を入力
- your Connected App ID: 作成した接続アプリケーションのコールバックURLを入力
以下、コマンドの実行例です。
$ forceios create
Enter your application type (native, hybrid_remote, or hybrid_local): hybrid_remote
Enter your application name: ForceMobileApp
Enter the output directory for your app (defaults to the current directory):
Enter the package name for your app (com.mycompany.my_app): com.comeeting.forcemobileapp
Enter your organization name (Acme, Inc.): co-meeting Inc.
Enter the start page for your app (only applicable for hybrid_remote apps): /apex/index
Enter your Connected App ID (defaults to the sample app's ID): 3MVG9ZL0ppGXXXXXXXXXXXXXXXXXXXXXXXXXXXXXXXXXXXXXXX
Enter your Connected App Callback URI (defaults to the sample app's URI): sfdc://success
Using cordova CLI version 5.3.1 to create the hybrid app.
Creating a new cordova project.
/Users/hrendoh/workspace/ForceMobileApp /Users/hrendoh/workspace
Adding ios project...
Discovered plugin "cordova-plugin-whitelist" in config.xml. Installing to the project
Fetching plugin "cordova-plugin-whitelist@1" via npm
Installing "cordova-plugin-whitelist" for ios
Fetching plugin "https://github.com/forcedotcom/SalesforceMobileSDK-CordovaPlugin" via git clone
Repository "https://github.com/forcedotcom/SalesforceMobileSDK-CordovaPlugin" checked out to git ref "master".
Installing "com.salesforce" for ios
Fetching plugin "org.apache.cordova.device" via npm
WARNING: org.apache.cordova.device has been renamed to cordova-plugin-device. You may not be getting the latest version! We suggest you `cordova plugin rm org.apache.cordova.device` and `cordova plugin add cordova-plugin-device`.
Fetching plugin "org.apache.cordova.device" via cordova plugins registry
Installing "org.apache.cordova.device" for ios
Fetching plugin "https://github.com/forcedotcom/PushPlugin" via git clone
Repository "https://github.com/forcedotcom/PushPlugin" checked out to git ref "master".
Installing "com.phonegap.plugins.PushPlugin" for ios
/Users/hrendoh/workspace

Your application project is ready in /Users/hrendoh/workspace/ForceMobileApp.

To build the new application, do the following:
   - cd /Users/hrendoh/workspace/ForceMobileApp
   - cordova build

To run the application, start an emulator or plug in your device and run:
   - cordova run

To use your new application in XCode, do the following:
   - open /Users/hrendoh/workspace/ForceMobileApp/platforms/ios/ForceMobileApp.xcodeproj in XCode
   - build and run

Before you ship, make sure to plug your OAuth Client ID,
Callback URI, and OAuth Scopes into www/bootconfig.json
ディレクトリMobileForceAppにCordovaプロジェクトが生成されます。
入力した値はSalesforce Mobile SDK独自の設定ファイルbootconfig.jsonに書きだされます。
このファイルは必要に応じで編集します。
// www/bootconfig.json
{
  "remoteAccessConsumerKey": "3MVG9ZL0ppGXXXXXXXXXXXXXXXXXXXXXXXXXXXXXXXXXXXXXXX",
  "oauthRedirectURI": "sfdc://success",
  "oauthScopes": [
    "web",
    "api"
  ],
  "isLocal": false,
  "startPage": "/apex/index",
  "errorPage": "error.html",
  "shouldAuthenticate": true,
  "attemptOfflineLoad": false
}
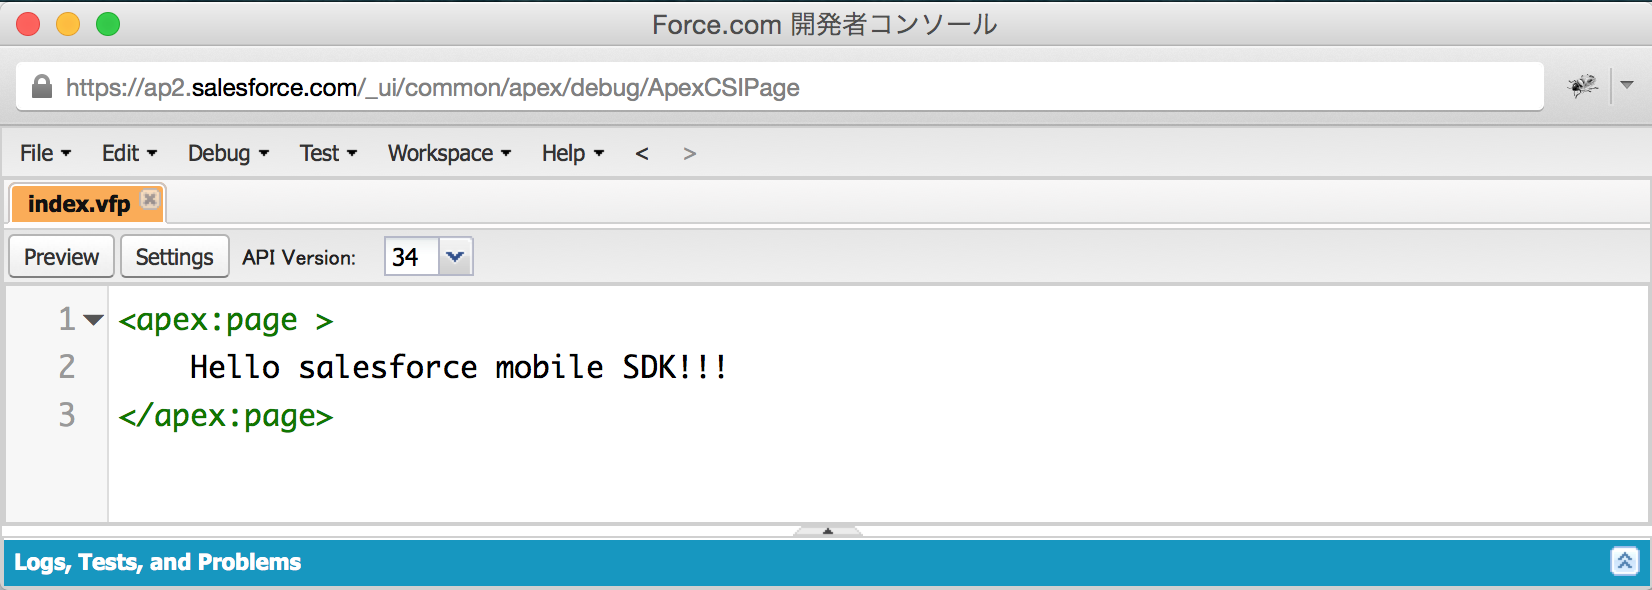
VisualForcePageを作成してアプリケーションで表示
開発者コンソールを開きindexという名前のVisualForcePageを作成します
プロジェクトディレクトリに移動して、プラットフォームiOSを追加してエミュレータでアプリを起動してみます。
$ cd MobileForceApp
$ cordova platforms add ios
Platform ios already added.
$ cordova emulate
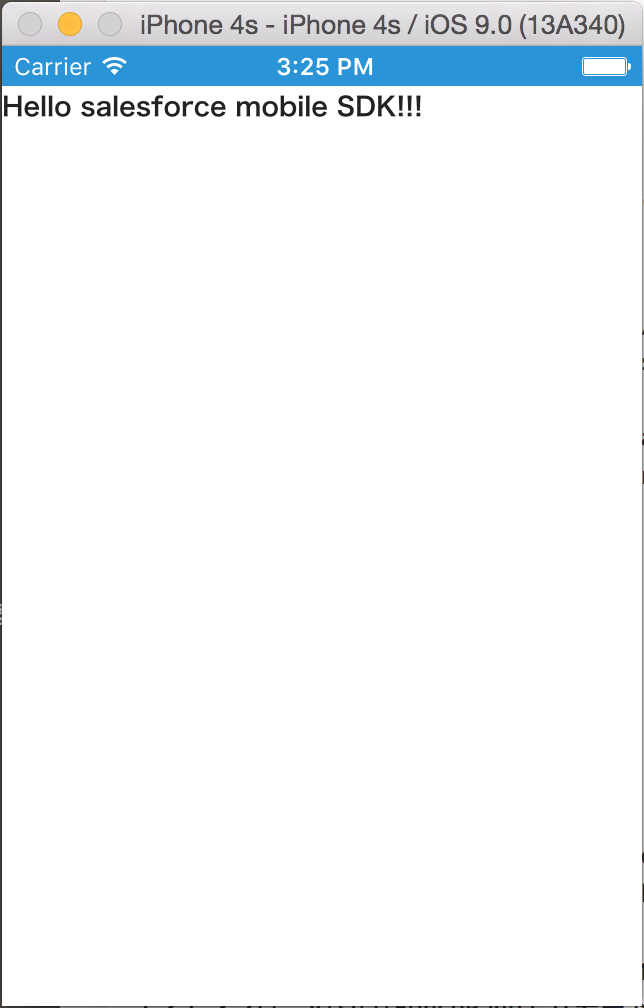
シュミレーターが起動され、作成したアプリケーションが表示されます。
OAuthログインするとVisualForcePageが表示されることを確認できます
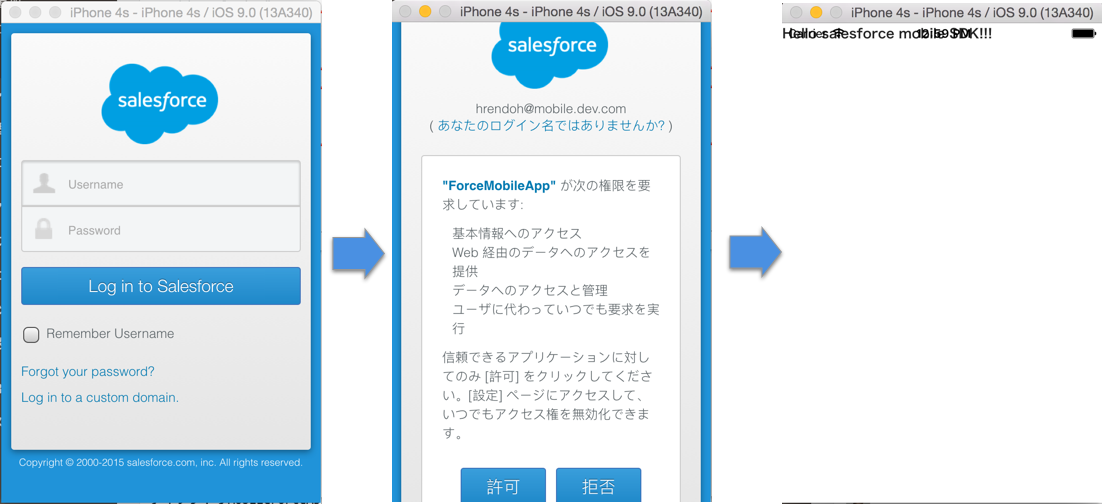
画像の通りステータスバーと表示が重なってしまっていますので、こちらはcordovaプラグインstatusbarを利用して修正します。
Cordovaプラグインの利用
ステータスバーなど、iOSネイティブの機能はCordovaのプラグインを利用して制御することができます。
ステータスバー用のプラグインorg.apache.cordova.statusbar(Github: apache/cordova-plugin-statusbar)を利用して、アプリケーションを修正してみます。
プラグインを以下のコマンドでインストールします。
$ cordova plugin add org.apache.cordova.statusbar
プラグインをインストールしたら、Cordovaの設定ファイルconfig.xmlにステータスバー用のプロパティを追加します。
// config.xml
<?xml version='1.0' encoding='utf-8'?>
<widget id="com.comeeting.forcemobileapp" version="0.0.1" xmlns="http://www.w3.org/ns/widgets" xmlns:cdv="http://cordova.apache.org/ns/1.0">
    <name>ForceMobileApp</name>
    <description>
        A sample Apache Cordova application that responds to the deviceready event.
    </description>
    <author email="dev@cordova.apache.org" href="http://cordova.io">
        Apache Cordova Team
    </author>
    <content src="index.html" />
    <plugin name="cordova-plugin-whitelist" version="1" />
    <access origin="*" />
    <allow-intent href="http://*/*" />
    <allow-intent href="https://*/*" />
    <allow-intent href="tel:*" />
    <allow-intent href="sms:*" />
    <allow-intent href="mailto:*" />
    <allow-intent href="geo:*" />
    <platform name="android">
        <allow-intent href="market:*" />
    </platform>
    <platform name="ios">
        <allow-intent href="itms:*" />
        <allow-intent href="itms-apps:*" />
    </platform>
    <preference name="StatusBarOverlaysWebView" value="false" />
    <preference name="StatusBarBackgroundColor" value="#2a94d6" />
</widget>
エミュレータを起動し直します。
$ cordova emulate
ステータスバーとコンテンツが重ならないようになりました。
参考:
iOS 7 ハイブリッドアプリケーションでのステータスバーの制御
iPhone実機へのインストール
platformes/iosディレクトリに、iOS用のXCodeプロジェクトが生成されています。
プロジェクトをXCodeで開いて、iPhoneにインストールします。
$ open platforms/ios/ForceMobileApp.xcodeproj/
開発機のiPhoneを選択してアプリケーションを実行すると以下のようにエラーになります。
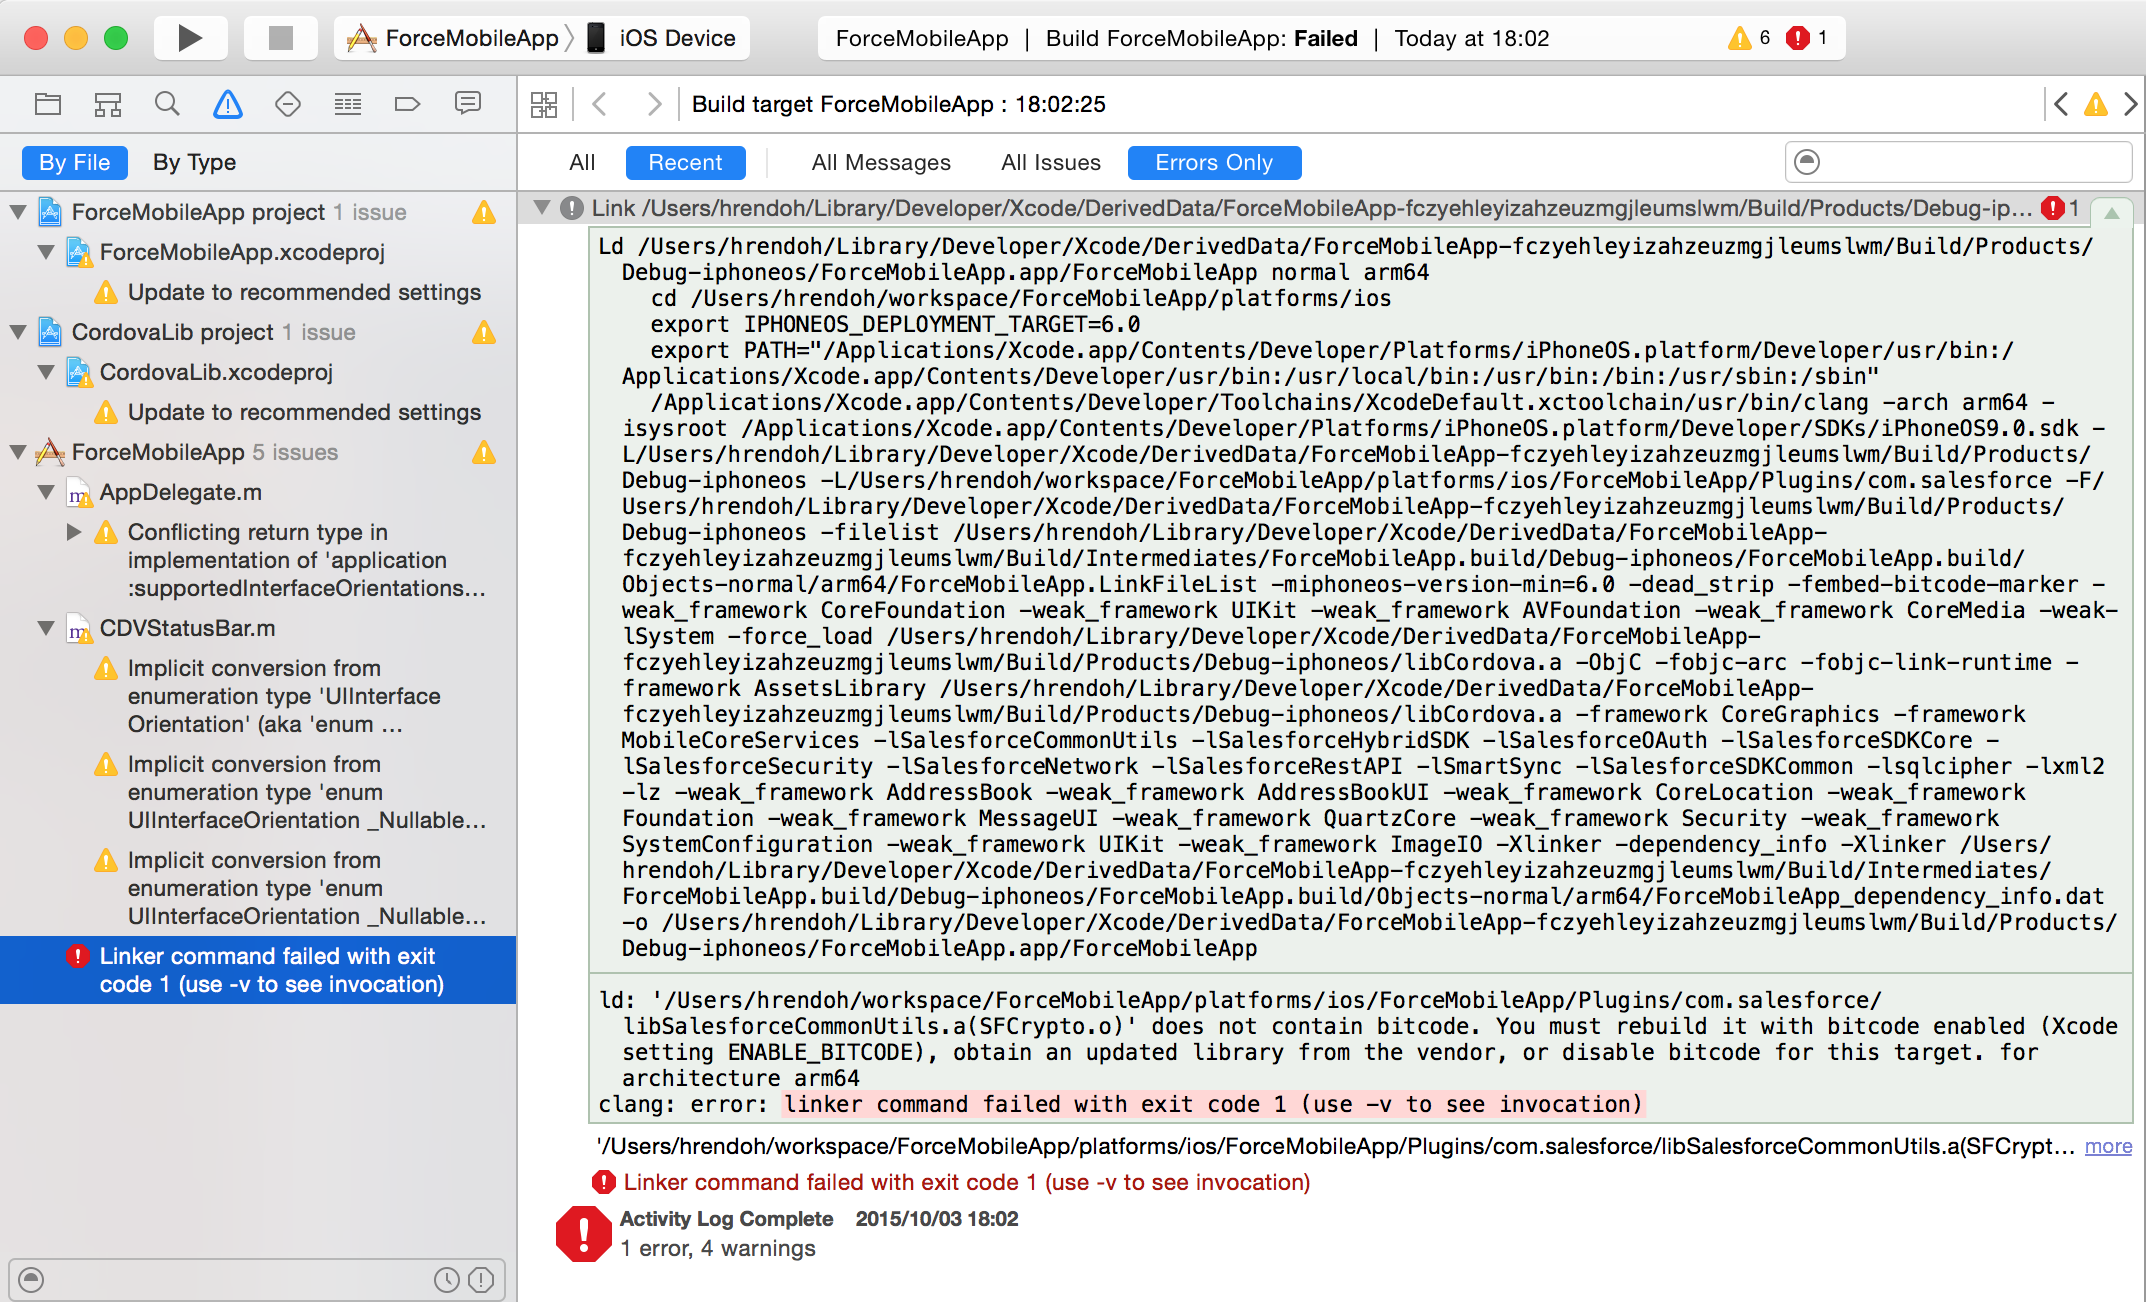
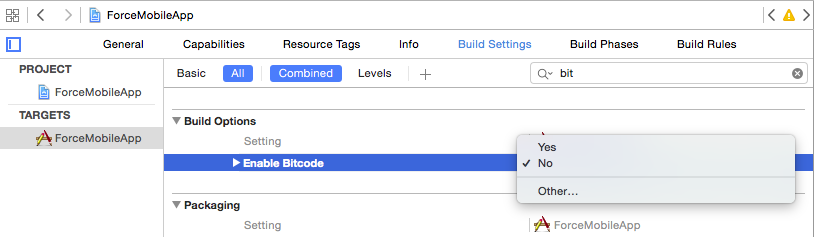
エラーを解消するには、[TARGETS] > [<プロジェクト名>]を選択して、[Build Settings]タブの[Build Options] > [Enable Bitcode]をNoに変更します。
再度実行すると正常にiPhoneアプリケーションがインストールされ実行されました。
参考: http://stackoverflow.com/questions/30848208/new-warnings-in-ios9
Visual Force PageからのCordovaライブラリへのアクセス
アプリに表示するコンテンツは、サーバーサイドのVisualForcePageを呼び出し取得しますが、Cordovaのコア機能やプラグインのJavascriptやネイティブコードはアプリ側にパッケージされます。
VisualForcePageで、Cordovaやプラグインの機能へアクセスするには、ハイブリッドリモートアプリケーションの開発で説明されているようにlocalhostで必要なjsファイルを指定したscriptタグを追加する必要があります。
この仕組みは、カメラやPush通知などデバイスにアクセスする機能を実装する場合に必要になります。
参考
Tips & Tricks for Building Hybrid Remote Mobile Apps using Salesforce Mobile SDK & Cordova
Push通知の実装
Force.comは、Push通知機能が標準で用意されています(結構発見した時は驚きました)。
Push通知の設定は、接続アプリケーションに用意されていて、iOSであればAPNsの証明書をアップロードするだけでPush通知が利用可能になります。
公式ドキュメントでは以下のリンクのページで解説されています
iOS での転送通知の使用
APNS (iOS) 用に接続アプリケーションを設定する
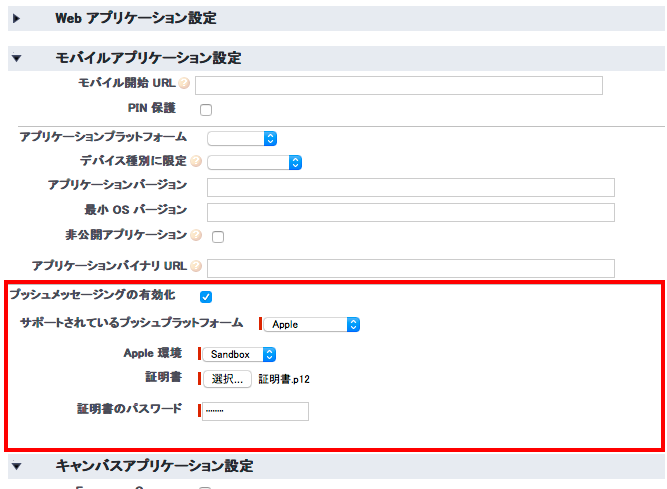
[設定]の[作成] > [アプリケーション]を開き、作成した接続アプリケーションの横の[編集]をクリックして編集画面を開きます。
以下の変更を加えて[保存]します。
- [モバイルアプリケーション設定]の[プッシュメッセージングの有効化]をチェックします
- [サポートされているプッシュプラットフォーム]は”
Apple“を選択 - [Apple 環境]は、開発用は”
Sandbox“を選択 - [証明書]には、キーチェーンアクセスから書きだした.p12形式の証明書を選択します
- [証明書のパスワード]には、キーチェーンアクセスから書きだした際に入力した証明書のパスワードを入力
以上で、Force側はPush通知を送る準備が整います。
次にアプリ側でPush通知を登録するコードを追加します
アプリケーションのコードは、www/index.jsを追加して記述しました。
アプリケーション初期化の雛形は、Cordovaでプロジェクトを作成した際に生成されるwww/index.jsを利用しています
// www/index.js
var app = {
    // Application Constructor
    initialize: function() {
        this.bindEvents();
    },
    // Bind Event Listeners
    //
    // Bind any events that are required on startup. Common events are:
    // 'load', 'deviceready', 'offline', and 'online'.
    bindEvents: function() {
        document.addEventListener('deviceready', this.onDeviceReady, false);
    },
    // deviceready Event Handler
    //
    // The scope of 'this' is the event. In order to call the 'receivedEvent'
    // function, we must explicitly call 'app.receivedEvent(...);'
    onDeviceReady: function() {
        app.initPushNotification();
    },
    // Initialize push notification
    initPushNotification: function(){
      cordova.require("com.salesforce.util.push").registerPushNotificationHandler(
          function(message) {
              console.log(message);
              // add code to handle notifications
          },
          function(error) {
              console.log(error);
              // add code to handle errors
          }
      );
    }
};

app.initialize();
ドキュメントは、「コードの変更 (ハイブリッド)」を参照
iPhoneでアプリを実行すると、以下のように通知を有効にするかを確認するダイアログが表示されます

[OK]をタップするとAPNsより取得したdeviceTokenがForce.comに登録されています
XCodeのコンソールに以下のようなメッセージが表示されていれば登録に成功しています
2015-10-03 22:47:37:849 ForceMobileApp[2825:b07] INFO|SFPushNotificationManager|Registration with Apple for remote push notifications succeeded
2015-10-03 22:47:38:184 ForceMobileApp[2825:8613] INFO|SFPushNotificationManager|Registration for notifications with Salesforce succeeded
2015-10-03 22:47:38:187 ForceMobileApp[2825:8613] INFO|SFPushNotificationManager|Response:{
    errors =     (
    );
    id = 0FG28000000BXXXXXX;
    success = 1;
}
通知のテスト
接続アプリケーションの詳細画面からPush通知のテストが可能です
Send Test Push Notifications to APNS
接続アプリケーションの詳細を開き[モバイルアプリケーション設定]の[テスト通知の送信]をクリックします

通知テスト用のページが開きます
受信者は、右側の虫眼鏡アイコンをクリックすると、登録されているiPhoneの接続トークン(deviceToken)とユーザー名を検索して選択できます
アラートは、通知メッセージをバッジにカウントをセットして[送信]をクリックしてます
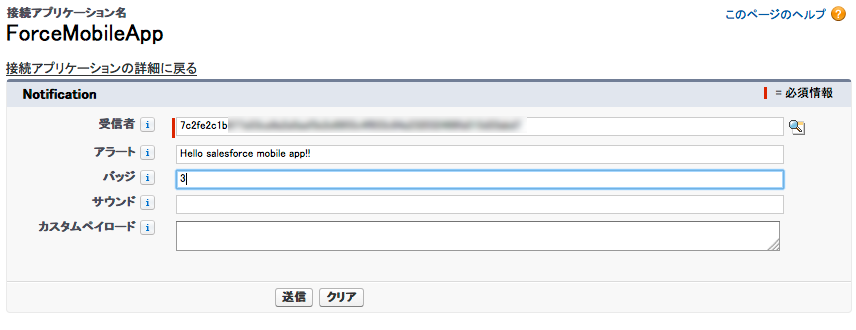
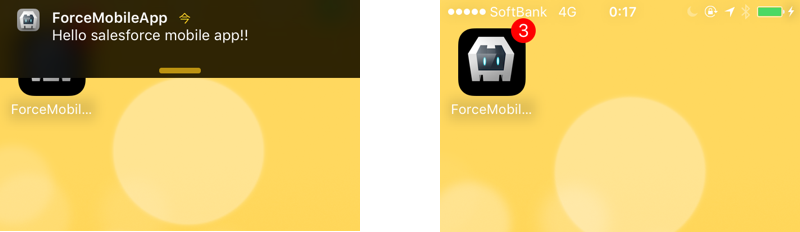
送信に成功すると、以下のように通知メッセージとバッジが表示されます
まとめ
以上、Salesforce Mobile SDKを利用したハイブリッドアプリの作成の基本とおまけでPush通知について解説してきましたが、いくつか気になった点がありました。
- アプリの起動が遅い。Salesforce Mobile SDKが提供しているプラグインのコードの初期化に時間がかかっている様子。要調査
- Bootstrap Error Pageがよく表示されてしまう。Mobile SDKに含まれるCordovaのバグの影響。こちらについては、解決策はこちら「Mobile SDK 3.x – Cordova Bug – Dialer Returns error for hybrid apps」
実際に、運用上レスポンスが要求されるような業務は、ちゃんと作成した方がよいですが、プロトタイピングとトライアルを重ねて業務をブラッシュアップするような開発には、この構成は検討の価値がありそうです。